Call or Text: +1 (208) 425-2990
Email: Sales@DroneSprayPro.com

7 Causes of Spray Nozzle Blockage
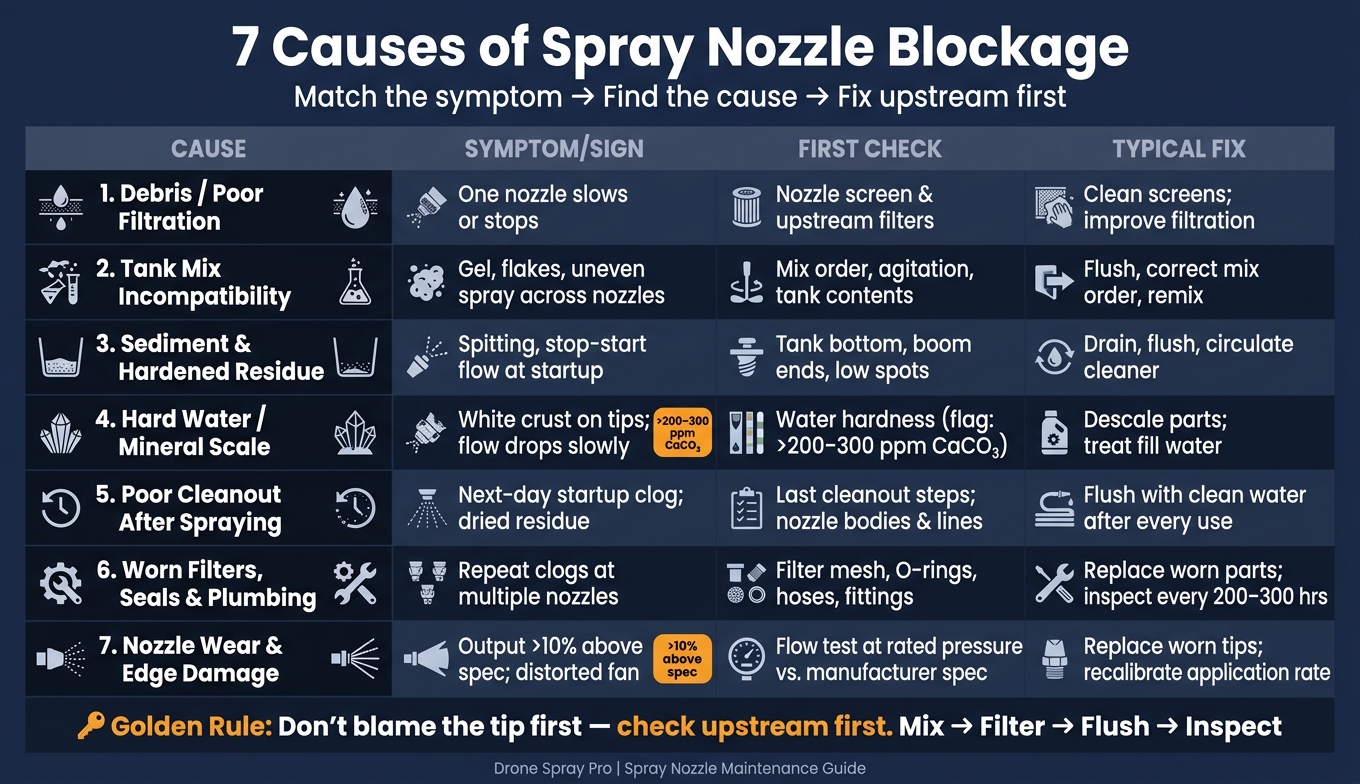
A blocked spray nozzle can cut output by more than 10% and leave missed strips fast. If I’m trying to find the cause, I start in this order: debris, bad tank mix, old residue, hard water, poor cleanout, worn parts, and worn tips.
Here’s the short version: most clogs start upstream, not at the nozzle tip. A weak fan, sputtering, white crust, gel in filters, or repeat clogs across more than one nozzle each point to a different source. The fix is usually simple: check screens, test with clean water, inspect the mix, and work backward through the system before replacing tips.
What I’d look for first:
- One weak nozzle: debris, a plugged screen, or tip damage
- Several weak nozzles: tank mix issue, residue in lines, or filter trouble
- White crust: hard-water scale, often above 200–300 ppm hardness
- Startup clogs after sitting: dried residue from the last load
- Output over 10% above spec: worn DJI Agras T50 nozzle tip, not a blockage
- Rubber or plastic bits in screens: aging seals, hoses, or filters
Quick comparison
| Cause | Common sign | First check | Usual fix |
|---|---|---|---|
| Debris / poor filtration | One nozzle slows or stops | Nozzle screen and filters | Clean screens, improve filtration |
| Tank mix error | Gel, flakes, uneven spray | Tank mix order and agitation | Dump, flush, remix correctly |
| Residue in tank/lines | Spitting, stop-start flow | Tank bottom, boom ends, low spots | Flush and clean deposits |
| Hard water / scale | White crust, slow loss of flow | Water hardness and nozzle buildup | Descale parts, treat water |
| Poor cleanout after spraying | Next-day clog | Cleanout steps after last job | Flush after each use |
| Worn filters / seals / plumbing | Repeat clogs in many spots | Filters, O-rings, hoses, fittings | Replace worn parts |
| Nozzle wear / edge damage | Bad fan, high flow rate | Flow test at rated pressure | Replace tip or full set |
If I keep one rule in mind, it’s this: don’t blame the tip first - check upstream first.
7 Causes of Spray Nozzle Blockage: Symptoms, Checks & Fixes
9 common problems with spray nozzles and how to solve them
sbb-itb-3b7eef7
Why Early Diagnosis Matters on Spray Drones
A blocked nozzle is an application accuracy problem, not just a maintenance issue. The controller can still show normal output even while actual delivery drops and spray-bar coverage turns uneven.
It also affects droplet size. When a nozzle gets restricted, atomization shifts, and droplets can move outside the target range. That increases drift risk. Any nozzle that varies by more than 10% from average output needs attention.[1][4]
Look for one weak nozzle, a distorted fan during a water test, uneven swath coverage, or an unexpected pressure change. A quick water test can tell you a lot. Run water through the system and check each fan against a dark background. In many cases, the clog didn’t start at the tip. It started farther upstream.
1. Insufficient Filtration and Debris in the Spray Mix
Typical Blockage Source
If a clog starts upstream, filtration is the first thing to check. When a filter misses debris, that material can travel straight to the nozzle tip and plug the orifice.
The usual troublemakers are sand, rust flakes, dried pesticide crystals, undissolved wettable powders, and bits of hose or gasket material. And it doesn't take much. Small nozzle passages plug in a hurry, so even fine particles can throw off the spray pattern.
Visible Spray-Pattern Signs
This kind of clog often shows up in pretty obvious ways: one weak nozzle, a fan pattern that looks uneven or warped, or dripping that comes and goes.
If pressure looks normal but one spraying drone path leaves a lighter swath, the issue is more likely at the nozzle or its screen than at the pump. At that point, don't swap the tip right away. Work backward through the filters first.
What to Check First
Start with the tank strainer. Then move downstream to the inline filter and, last, the nozzle screen itself.
Pull the nozzle, rinse the screen into a clean container, and check what comes out. That debris can tell you a lot about where the contamination is getting in. Also make sure the filter mesh matches the nozzle opening.[5] This step-by-step check helps you pin down whether the blockage is at the screen, the filter, or the tank.
Most Likely Corrective Action
- Match filter mesh to the nozzle opening.
- Clean strainers and screens after every spray.
- Pre-filter water and chemicals before filling the tank.
If the same nozzle plugs again, look upstream instead of blaming the tip alone. And be careful when cleaning it: use a soft nylon brush or a nozzle tool, never wire, knives, or drill bits.
2. Tank Mix Incompatibility and Chemical Mixing Errors
If filtration checks out, the next place to look is the tank mix. Tank-mix incompatibility can clog spray drone nozzles FAST. When products separate, they can turn into sludge, gels, clumps, or precipitates that plug strainers and nozzle screens. And this problem often starts well before the nozzle. Spray drones are hit harder because their plumbing is small and filtration capacity is limited, so there’s less room for mistakes.[7][9][6][10]
The first warning signs usually show up in the tank itself: layering, flakes, foam, or curdled residue. Once you’re in the air, the issue often looks like uneven spray, spitting or streaming tips, and a group of nearby nozzles with weak flow.[8][11][14][15]
If you think the mix is the issue, inspect the mix before swapping parts:
- Check the tank for sludge, clumps, or separation.
- Check mix order and make sure each product fully dispersed before the next one went in.
- Confirm agitation was running and carrier volume was enough.
- Check strainers and filters for product-colored residue or gel.
- Run a jar test with the same carrier water before you remake the mix.[7][9][13][16][8][9][12]
If the mix heats up, foams heavily, or gives off gas, stop and treat it as incompatible.[12][14]
If the mix looks clean at first glance, look closer at what may have settled or hardened in the tank and lines.
3. Sediment and Hardened Residue in Tanks and Lines
Even if the mix itself looked fine, residue can still be the thing clogging the system. Material from a past job often sticks around in places you don’t easily see. It tends to hide on tank walls, at boom ends, and in low spots. Once you refill the sprayer and bring it up to pressure, flow and recirculation can knock those deposits loose and push bits of them downstream into the nozzle orifice or strainer.[25] So if the tank mix looked clean, the clog may be coming from material that dried inside the system after the last use.
Typical Blockage Source
The usual suspects are wettable powders (WP), water-dispersible granules (WDG), dried film from earlier applications, and high-load liquid suspension concentrates. This material often builds up in boom ends, low points in supply lines, pump housings, filters, and strainer cavities where flow slows down and particles settle.[25][26]
Leaving spray mix in the tank or lines overnight makes this much more likely. The material can dry or crystallize on interior surfaces, then break loose in flakes the next time the system runs.[20]
Visible Spray-Pattern Signs
Sediment and dried residue often show up as intermittent flow, spitting droplets, or nozzles that stop and restart. That can leave narrow under-dosed streaks in the field.[18][22][23] When you remove the nozzle and look inside, you may see a film, paste-like buildup, or hard rings of residue in the nozzle body or on the screen that plain water won’t wash away.[17]
What to Check First
Start with a plain visual check.
- Shine a flashlight inside the tank and look for crusted layers around the drain port, corners, and baffles.
- Disconnect a hose section near the manifold and inspect the inner wall for residue or crust.
- Pull the nozzle screens and strainers and check for fine sand-like particles, paste deposits, or hard residue rings.[25][26]
One question matters right away: Was the tank fully emptied and rinsed after the last job, or did it sit with mix still inside? If it sat with mix in it, residue may be spread through the whole system.[20]
Most Likely Corrective Action
Flush the tank, lines, and boom with clean water. Then do it again until no residue is left. If deposits are hardened and won’t come loose, use a tank-cleaning product labeled for the sprayer and the chemistry involved. Let it recirculate, then flush it through the boom ends and hose sections.[24][26]
After that, take apart the nozzle bodies, screens, and strainers. Scrub them in warm, soapy water with a soft brush. Skip metal picks or wire. Those can damage the orifice and throw off the spray pattern.[19][21][22]
Once everything is back together, run clean water at operating pressure and compare output across all nozzles.
If cleaning doesn’t fix the flow, the next place to look is water quality and mineral scale.
If residue doesn’t seem to be the issue, check for dissolved minerals and scale in the water supply.
4. Poor Water Quality and Mineral Scale
If you've ruled out residue and mix mistakes, hard water is the next place to look.
Water quality has a big impact on spray performance. Well water, canal water, pond water, and other untreated rural sources can carry dissolved minerals. As that water dries, those minerals can turn into hard scale inside nozzles and screens. This buildup happens little by little, and it tends to show up first in fine nozzles and screens.
Water hardness above 200–300 ppm as CaCO₃ can cause trouble. Above 300 ppm, the water is considered very hard.[2][27] At that point, dissolved minerals may also react with some pesticides and adjuvants and form solid precipitates, which can add to the blockage problem.[31][33]
Typical Blockage Source
Scale can form inside nozzle orifices, strainer screens, manifolds, and supply lines - basically any spot where flow slows down. A change in water source can also change clogging patterns from one field to the next.
It often builds in screens, manifolds, and low points in the lines. And if water or spray mix sits in the system between jobs, the problem tends to get worse.[29]
Visible Spray-Pattern Signs
Mineral scale usually causes a slow drop in performance, not a sudden plug. One or more nozzles may start putting out less spray before they stop altogether.
You may also see:
- A distorted or uneven fan pattern
- A narrower spray angle
- Coarser droplets
- Streaking in the coverage pattern
A white or off-white crusty deposit on nozzle tips or filter housings is one of the clearest signs. Hard-water deposits usually leave a white, crusty edge, which looks different from softer residue or sludge.
What to Check First
Start by pulling the affected nozzles and looking closely at the orifice and strainer screen. If you see white, hard residue, compare that nozzle to a clean one. Then test the fill water.
Also check in-line filters and the manifold for the same type of buildup, especially if several nozzles are acting up at once. If the fill water hasn't been tested yet, begin with hardness, then check turbidity and pH.[2][27][28]
Most Likely Corrective Action
Remove the nozzle bodies and strainers, then soak them in a manufacturer-approved descaling solution for 30–60 minutes. Heavy deposits may need more time.[29][32][34] After soaking, scrub gently with a soft brush and rinse well with clean water.
Once that's done, flush the system to clear out any loosened deposits. For future loads, test your fill water and think about pre-filtering it before it reaches the tank. If hardness stays high, a water conditioner like ammonium sulfate can help cut down on hardness-related deposits and spray-mix problems.[30][3]
If scale keeps coming back after cleaning, the next thing to inspect is how the system is being cleaned and flushed between jobs.
5. Inadequate Cleaning and Flushing After Spraying
Skipping post-spray flushing is one of the most common reasons nozzles clog over time. When leftover mix stays in the system after spraying, it can dry into new deposits inside the lines and parts. This kind of blockage forms after the job is done, which makes it different from mix mistakes or hard-water scale.
Typical Blockage Source
Fertilizer mixes and micronutrient blends often leave behind deposits as the water evaporates. Those deposits can dry into thin films, crystals, or gel-like residue. On spray drones, centrifugal nozzle disks and inlets are frequent trouble spots when flushing gets skipped after a session.
Visible Spray-Pattern Signs
This kind of clog usually shows up as a gradual drop in flow across several nozzles, not one nozzle suddenly failing. You may also see streaks or dry bands in the field under certain boom sections, even when pump output seems normal.
In some cases, pressure goes up at the same flow setting. That usually points to a partial blockage, with the pump working harder to push liquid through.
What to Check First
If the clog shows up after a job change or after the system sat overnight, start with post-spray cleanup. Check when the system was last fully flushed and whether any tank mix was left sitting overnight.
Then look at these areas:
- Tank interior
- Nozzle screens
- Line strainers
- Boom end caps for dried residue or discoloration
After that, run a water-only test with the nozzles removed. This helps you see whether flow is even at each outlet. If flow is still uneven with the nozzles off, the blockage is farther upstream, likely in the filters, lines, or valves.
6. Worn or Damaged Filters, Seals, and Plumbing Components
Sometimes the problem isn’t the nozzle at all. It starts with worn parts upstream that let debris slip past the system.
Typical Blockage Source
Filters, O-rings, fittings, and manifold connections wear down over time from vibration, pressure changes, UV exposure, and chemical contact. Once a filter mesh stretches or tears, particles can move downstream and end up at the nozzles. Cracked seals on the suction side of the pump are even more troublesome. They can pull in outside contamination through tiny air leaks, so dust, soil, and plant debris get mixed into the spray stream.
Older rubber and plastic plumbing parts can create trouble from the inside too. As they age, they may shed small fragments, and those bits travel with the liquid until they get stuck in a nozzle orifice or pre-orifice screen.[41][43]
Visible Spray-Pattern Signs
The first clue is often uneven output across more than one nozzle. Some may throw a coarse, spattery fan while others still look fine. You might also notice occasional jetting, where a nozzle sends out a narrow stream instead of a full, even fan.
When partial clogs keep coming back across different products, that usually points to worn hardware farther upstream. Nozzle strainers that keep collecting rubber specks or plastic chips are a strong sign that parts inside the system are starting to break down.[41][43]
If the same clog pattern keeps showing up, move upstream to the filters, seals, and fittings.
What to Check First
Start before the nozzle, not at it. Check these areas first:
- In-line filters and strainers - Look for torn mesh, bent screens, or debris piling up on one side, which can point to bypass.
- O-rings and seals - Inspect pump housings, manifold caps, and quick couplers for cracks, flat spots, or chemical swelling.
- Hose connections and fittings - Check for damp spots, dried residue around joints, or air bubbles in clear tubing while the system is running.
- Maintenance records - Verify when filters, seals, and plumbing parts were last replaced. If it’s been a long time, worn hardware becomes the top suspect.[37][42]
Most Likely Corrective Action
Replace any damaged or questionable filters with manufacturer-specified parts. Match both the mesh size and the material to your drone model, such as the DJI Agras T50 Atomized Sprinkler Package. Install new chemical-resistant O-rings and gaskets at the main joints, and replace hoses or fittings that show internal flaking, cracks, or swelling, especially near the pump and boom.[37][39]
After that, flush the full system with clean water. Then clean or replace the nozzle strainers and tips. Finish with a ground test, or calibration spray, to make sure each nozzle has even flow and the right spray pattern.
A simple habit helps here: inspect filters and seals before each spray day. It also makes sense to replace them on a set schedule, around every 200–300 operating hours, and sooner if you’re working with abrasive formulations or in dusty field conditions.[37][38]
If flow still varies after those replacements, inspect the nozzle body for wear or edge damage.
7. Nozzle Wear and Edge Damage That Trap Buildup
Even when the rest of the system is clean, the nozzle tip itself can be the source of the blockage. It’s easy to miss. A worn or damaged tip may still spray, but not in a clean, even way.
Typical Blockage Source
Abrasive particles in the spray mix can wear down the orifice edge over time. That includes sand, silt, clay, and crystalline solids from suspension concentrates and wettable granules. Scratches or chips from rough handling or poor cleaning can make things worse by leaving small catch points where residue starts to collect.[1][45][35][47]
Visible Spray-Pattern Signs
This kind of wear usually doesn’t shut the nozzle off all at once. More often, it shows up in the spray pattern first. You may see a distorted fan that leans to one side or sprays heavier along one edge, which can leave uneven bands across the swath.[38][52][54]
Flat-fan tips may also start to throw a thicker band through the center and a tighter effective spray angle.[53][55] That kind of shift is a red flag. The nozzle is still working, but not the way it should.
What to Check First
Start with pressure. Then remove the tip and run a clean-water flow test at the manufacturer’s specified pressure. If the nozzle is flowing more than 10% above its rated output, replace it.[15][35][44][40][38][36][50][51]
If the tip passes the test, use the symptom-to-cause reference to narrow down the next suspect.
Most Likely Corrective Action
Replace worn tips. In many cases, it makes more sense to replace the full set on the boom instead of swapping only the failed one.[46][35][15] Mixing new tips with worn ones can lead to banding.[38][49]
After you install new tips, recalibrate the drone’s application rate with clean water. Then verify pattern symmetry on a test surface before going back to work.[49][46]
It also helps to inspect tips on a regular schedule and log output at least once per season. Any nozzle that runs more than 10% above spec should be replaced.[48][36]
These signs help separate nozzle wear from an upstream blockage.
Quick Symptom-to-Cause Reference
Use this table to match what you’re seeing in the field with the most likely cause. Start by figuring out whether the problem is limited to one nozzle, one boom section, or the whole system. That quick check can save time and help you avoid swapping parts that aren’t the problem.
| Cause | What It Looks Like | What to Check First | Typical Fix |
|---|---|---|---|
| Debris / insufficient filtration | One nozzle stops or slows | Nozzle strainer and tip; compare output with neighboring nozzles | Clean or replace the nozzle screen; improve upstream filtration |
| Tank mix incompatibility | Clogs start after a new mix; flakes or gel appear | Mix recipe, order of addition, tank agitation | Correct mixing order; agitate thoroughly; flush and restart with a compatible mix |
| Sediment / hardened residue in tank and lines | Startup clogs or weak first-second flow | Tank bottom, suction strainer, line low points, pump inlet | Drain, flush, circulate cleaner, then clean nozzles and screens |
| Poor water quality / mineral scale | White crust on tips; clog returns after cleaning | Water source; visible deposits inside nozzles and plumbing | Use a manufacturer-approved descaler, flush the system, and treat hard fill water |
| Inadequate cleaning after spraying | Next-day startup clog; dried residue in lines | Nozzle bodies and lines for visible residue; review last cleanout | Flush with clean water after each use and clean before storage |
| Worn or damaged filters, seals, or plumbing components | Intermittent clogs; inconsistent pressure | Filter mesh condition, O-rings, hose integrity, connector tightness | Replace damaged seals or filter housings; check for bypass around the filter assembly |
| Nozzle wear and edge damage | Output differs by more than 10%; fan is distorted or banded [1][56] | Flow test at rated pressure; compare output against manufacturer spec | Replace worn tips; verify output against manufacturer spec |
If the symptom seems to start upstream, go to the first checks before you replace nozzles.
First Checks Before Replacing Nozzles
After you match the symptom to a likely cause, confirm it with a clean-water test before you swap any parts. Run clean water at normal pressure and spray it onto a clean, flat test surface. Then watch each nozzle closely for an uneven fan pattern, sputtering, or low output. Check all nozzles at the same pressure and flow setting so you're making a fair comparison.
If one nozzle looks off, the problem is probably local to that nozzle. If several nozzles are underperforming, the cause is more likely farther upstream.
Start by removing the nozzle and checking the strainer. Don't use metal pins, probes, or hard picks on nozzle tips. That can damage them fast.
If the strainer is clear, move upstream in a fixed order: tank filter → suction filter → lines and end caps → water source. When filters keep plugging, that's a strong sign of sediment or hard-water scale in the source water.
Before replacing a nozzle, check the manufacturer's rated flow. Replace the nozzle only if the flow is still outside the manufacturer's spec after cleaning. If the cleaned nozzle stays within spec, keep working upstream.
Conclusion
Use the seven causes above as a simple checklist any time field flow starts to change. Most spray nozzle clogs come back to a short list: filtration issues, mix mistakes, residue, hard water, poor cleanout, worn parts, or nozzle damage. The fastest path is simple: match the symptom to the cause, then check upstream before you swap tips.
If the symptom isn’t obvious, use the quick-reference table and start at the nozzle, then work backward through the system. The symptom points you to the first place to look. Check screens before flight, flush with clean water after flight, and inspect tips, seals, and filters while the system is still clean. One rule shows up across all seven causes: Mix, Filter, Flush, Inspect.
Drone Spray Pro can help with DJI Agras T50 maintenance guidance and model-specific setup for your operation.
FAQs
How can I tell if a clog started upstream?
Start by checking the internal parts of the spray system. If several nozzles have flow issues or the pressure keeps changing, the clog probably began in the lines, pump, or filters, not at a single nozzle tip.
Look at the nozzle screens and strainers for debris, then flush them with clean water. If the flow is still uneven across the outlets, the blockage is probably farther upstream.
When should I replace a nozzle instead of cleaning it?
Replace the nozzle if you find cracks or warping during inspection, or if testing shows the flow rate is more than 10% higher or lower than a new nozzle of the same type at the same pressure.
It should also be replaced if uneven spray patterns or dripping continue after cleaning. Service life matters too:
- Ceramic or stainless: 400–500 hours
- Polymer: 250 hours
What maintenance helps prevent repeat nozzle blockages?
Prevent repeat nozzle clogs by cleaning the sprayer the same way after every use. Run clean water through the spray system for 30 to 60 seconds. Also check filters and strainers on a regular basis, and wash out any buildup before it turns into a bigger headache.
For deeper cleaning, soak nozzle tips in white vinegar for 30 minutes or use 70% rubbing alcohol, depending on the type of residue. Stick with a soft-bristled brush when scrubbing. Skip metal tools, since they can damage the nozzle opening and make spray patterns uneven.
A simple weekly check helps too. Run a clean-water test and look for any change in flow or spray pattern so you can catch clogs early.
