

Call or Text: +1 (208) 425-2990
Email: Sales@DroneSprayPro.com

How to Export Variable Rate Maps for Spray Drones
To export a variable-rate map, I match the file to the drone’s controller, set numeric rates and units, and check the imported mission before loading product. A map that opens isn’t proof that the drone can apply it.
I use 3 checks to guide the process:
- Prepare the map: Check DJI Agras T50 model and firmware support, treatment zones, rate limits, buffers, and spray settings. Keep zero-rate areas separate from missing data.
- Export the package: Use the required coordinates and file format, then transfer all files and folders intact.
- Verify the mission: Check alignment, rates, units, zone edges, and variable-rate mode. Confirm delivery capacity and calibration, plus label and flight requirements.
My rule: <u>check what the controller will apply - not just what the map displays.</u>
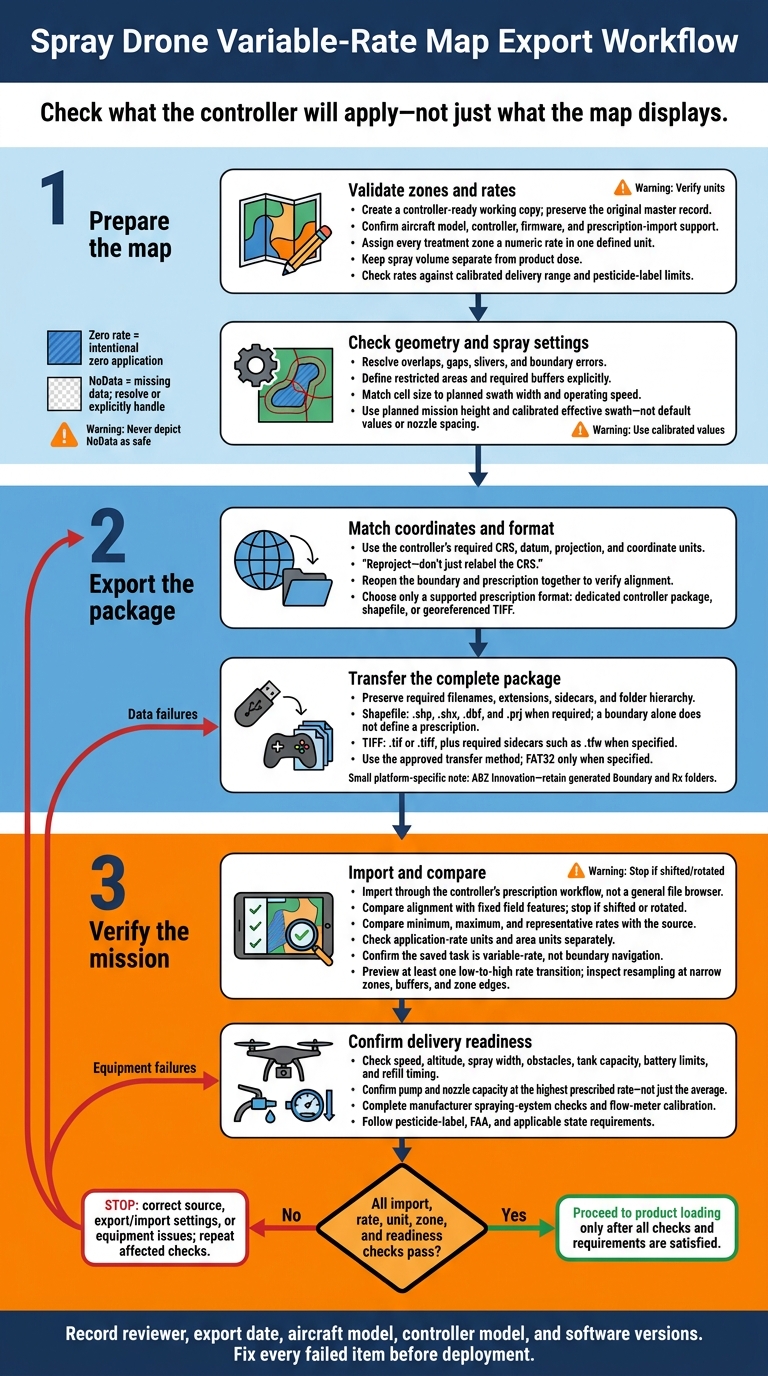
Spray Drone Variable-Rate Map Export Workflow
How to Create a Prescription map in Agremo | Step-by-Step Guide
sbb-itb-3b7eef7
Step 1: Prepare Application Zones and Rates
Create a controller-ready working copy from validated agronomic data. Build management zones using documented agronomic data, scouting, imagery, yield maps, or another validated layer. Keep the original as the master record, and export only from the working copy.
Record the field name, crop, treatment, date, source, and approver. Then use the working copy to standardize rates and geometry before export.
Check Rate Values and Application Units
Give every treatment zone a numeric rate in one defined unit. Replace text labels, blanks, negative values, and invalid decimals. Verify that the export uses the intended rate attribute.
Resolve gaps and NoData cells by correcting them, deliberately excluding them, or assigning an approved rate. Keep NoData separate from an intentional zero rate.
Keep spray volume separate from product dose. Use supported units: U.S. gallons per acre for spray volume, fluid ounces or pints per acre for product dose, and pounds per acre for dry or granular applications.
Check rates against the aircraft’s calibrated delivery range. Also check the pesticide label’s method limits, minimum spray volume, and single- and seasonal-application limits.
Check Zone Geometry, Cell Size, and Spray Settings
Check zone geometry against controller limits. Use current imagery to spot boundary errors, overlaps, gaps, slivers, isolated polygons, and extreme rates.
Resolve overlaps using a documented priority rule. Simplify tiny treatment polygons only where the agronomic recommendation allows it. Mark waterways, required buffers, and other restricted areas with explicit boundaries or exclusions that the workflow supports.
Match cell size to the planned swath width and operating speed. Do not export detail the aircraft cannot apply accurately.
When the exporter asks for flight height and spraying width, enter the planned mission height and calibrated effective swath, not default values or nozzle spacing.[1]
Step 2: Set Coordinates and Export Files
Once zones and rates are set, export them using the controller’s required CRS and file structure. Follow the export path documented for your aircraft and controller. A file that opens in GIS may still fail as a variable-rate mission on the drone. Align the coordinates first, then check that the controller can import the file package.
Match Coordinate Systems and Map Position
Use the controller’s required CRS, datum, projection, and coordinate units. Reproject the data before export - don’t just relabel the CRS. Keep georeferencing intact in the exported files. Then reopen the boundary and prescription together to check that both line up with known field features.
Check Supported Prescription File Formats
Check the controller’s import specifications against this table.
| Export type | Required files | Rate-data structure | Folder requirements | Import method and acceptance |
|---|---|---|---|---|
| Dedicated controller package | Complete software-generated package | Destination-specific rate encoding | Keep generated names and folder hierarchy intact | Use the documented task or map import; support depends on the model and firmware |
| Shapefile |
.shp, .shx, .dbf, and .prj when required |
Attribute-table rate field with the exact name, data type, and units the controller expects; a boundary file alone does not define a prescription | Keep matching components together in the required folder | Boundary or prescription import, only where supported |
| Georeferenced TIFF |
.tif or .tiff, plus required sidecars such as .tfw when specified |
Raster bands or pixel values represent application rates; confirm pixel size, extent, NoData value, and rate units | Keep georeferencing and any required sidecars intact | Prescription-raster import; support depends on the model and workflow |
For platform-specific exports, follow the documented boundary and prescription paths exactly.[1][2]
Keep the Package Intact and Transfer Files
Copy the complete exported package, keeping filenames, extensions, sidecars, and folders intact. Don’t rename, edit, or recompress them unless permitted. Use the approved transfer method, and format media as FAT32 only when specified.
Handle ABZ Innovation exports separately: retain any generated Boundary and Rx folders. After transfer, check that the controller detects both the boundary and prescription.
Step 3: Import and Check the Controller Mission
After transferring the file, import it through the controller’s prescription workflow - not a general file browser. Follow the documented Prescription Map, Prescription Import, or Task Management workflow. For DJI Agras, prescription tasks may be copied to a microSD card, inserted into the remote controller, and selected from the import prompt. Imported maps should then appear in the controller’s prescription-map area.[3][5] Do not load product until the map passes visual and numeric checks.
Verify Map Alignment, Rates, and Units
Zoom to the field and compare the imported boundary with fixed features: visible field edges, roads, drainage channels, waterways, and tree lines. Check for shifts, clipped areas, and missing zones. If the map is shifted or rotated, stop. Correct the coordinate reference system or export settings rather than moving the mission manually.
Check the active rate field, raster band, or prescription layer. Compare minimum, maximum, and representative values with the source, then confirm application-rate units and area units separately. In the documented PIX4Dfields–DJI Agras workflow, select hectares as the source area unit during import. This setting does not change spray-rate units.[1]
Check Variable-Rate Mode and Resampling
Make sure the saved task is marked as variable-rate, prescription-spraying, or an equivalent application task - not just boundary navigation. Preview the route across at least one low-to-high rate transition and check that the controller references the prescription map.
The controller may resample the source grid to fit its cell size or route spacing. This can change rates at zone edges. Inspect narrow strips, zero-rate zones, and NoData areas; zero and NoData are not interchangeable. If rates, units, or zones differ from the source, correct the source or import settings, re-export, and repeat the checks.
Review Flight Settings and Spray Delivery Limits
Review route geometry, spray width, altitude, speed, obstacles, tank capacity, battery limits, and refill timing. Confirm that the pump and nozzles can deliver the highest prescribed rate at the planned speed and swath - not just the average rate. Document the mission in feet, acres, and U.S. gallons, but enter metric values when the controller requires them.
A correct import does not guarantee correct delivery. Complete the manufacturer’s spraying-system checks and flow-meter calibration to deliver the mapped rates accurately. DJI guidance includes clearing trapped air and calibrating with water. Before loading product, inspect hoses, nozzles, tank installation, and battery condition.[4][6] Follow pesticide-label, FAA, and applicable state requirements before application.[7]
Final Export Checklist
Run this final check after import and before loading product. First, record the reviewer, export date, aircraft model, controller model, and software versions. Fix every failed item before deployment.
| Check | Verification method | Pass/fail status |
|---|---|---|
| Aircraft and controller | Match both models to the export profile. | ☐ Pass ☐ Fail |
| Firmware and app | Record versions and check manufacturer documentation for prescription-import support. | ☐ Pass ☐ Fail |
| Import format | Confirm the required prescription format. | ☐ Pass ☐ Fail |
| Coordinate alignment | Compare field corners with the controller map. | ☐ Pass ☐ Fail |
| Numeric rates | Compare minimum, maximum, and sample values in the source and imported data. | ☐ Pass ☐ Fail |
| Application and area units | Check each separately. Confirm whether rates represent product dose or total spray. | ☐ Pass ☐ Fail |
| Zero-rate and NoData | Check that each behaves as intended in the preview. | ☐ Pass ☐ Fail |
| Cell size | Check that the resolution preserves narrow treatment zones and buffers. | ☐ Pass ☐ Fail |
| Flight height and spray width | Match saved settings to the planned application footprint. | ☐ Pass ☐ Fail |
| Package integrity | Check that all required files, sidecars, names, and folders transferred intact. | ☐ Pass ☐ Fail |
| Rate legend | Match legend labels to rate values - not just colors. | ☐ Pass ☐ Fail |
| Resampling | Record the resampling method and check for edge effects. | ☐ Pass ☐ Fail |
| Saved variable-rate task type | Reopen the saved task. Confirm variable-rate mode and the correct aircraft profile. | ☐ Pass ☐ Fail |
FAQs
Why does my controller reject a valid prescription file?
Controllers can reject valid files when the format or data structure doesn’t match their requirements. DJI systems require Shapefiles (.shp, .shx, .dbf, .prj), often stored in specific folders. XAG systems require KML and JSON files.
Use WGS84 (EPSG:4326) and include the required fields - typically rate, rateInt, unit, and zone. Keep each file under 200 MB and filenames under 45 characters. Avoid complex polygons, and make sure every KML file includes Z-altitude data.
How can I test rate changes before spraying?
Import your prescription file into the controller’s variable-rate or prescription map menu. Overlay the file on a basemap, then check that treatment zones line up with your field boundaries and the areas you plan to treat.
Before takeoff, confirm that the coordinate system is set to WGS 84 (EPSG:4326). Also check that the controller correctly reads the rate, rate integer, unit, and zone ID fields so it can apply the intended rates.
Can I reuse a prescription map on another drone?
Yes - as long as you export the prescription map in a format your drone’s controller supports. File requirements depend on the manufacturer: DJI Agras models use Shapefiles, while XAG systems use KML and JSON files.
Before each flight, check that the coordinate system is WGS84 (EPSG:4326) and that the application rates and units are set correctly for the drone you’re using.
