
Call or Text: +1 (208) 425-2990
Email: Sales@DroneSprayPro.com

Calibrating Drone Spray Swaths for Even Coverage
I set drone pass spacing from measured spray deposits - not the farthest visible stain. My starting point: clean-water tests with cards across the flight path, at least 3 repeat passes when practical, and new cards for each run.
Here’s what I check before using that spacing:
- The overlap: I test adjacent passes for gaps and heavy bands, then adjust spacing.
- The application rate: I measure gallons used over a known treated area to check gallons per acre.
- The conditions: I record height, speed, flow, payload, wind, and canopy, then retest when they change.
- The limits: I follow label and flight rules and confirm deposits in the intended canopy before production spraying.
My rule: <u>card coverage shows distribution</u> - not proof of droplet size, deposited dose, or pest control.
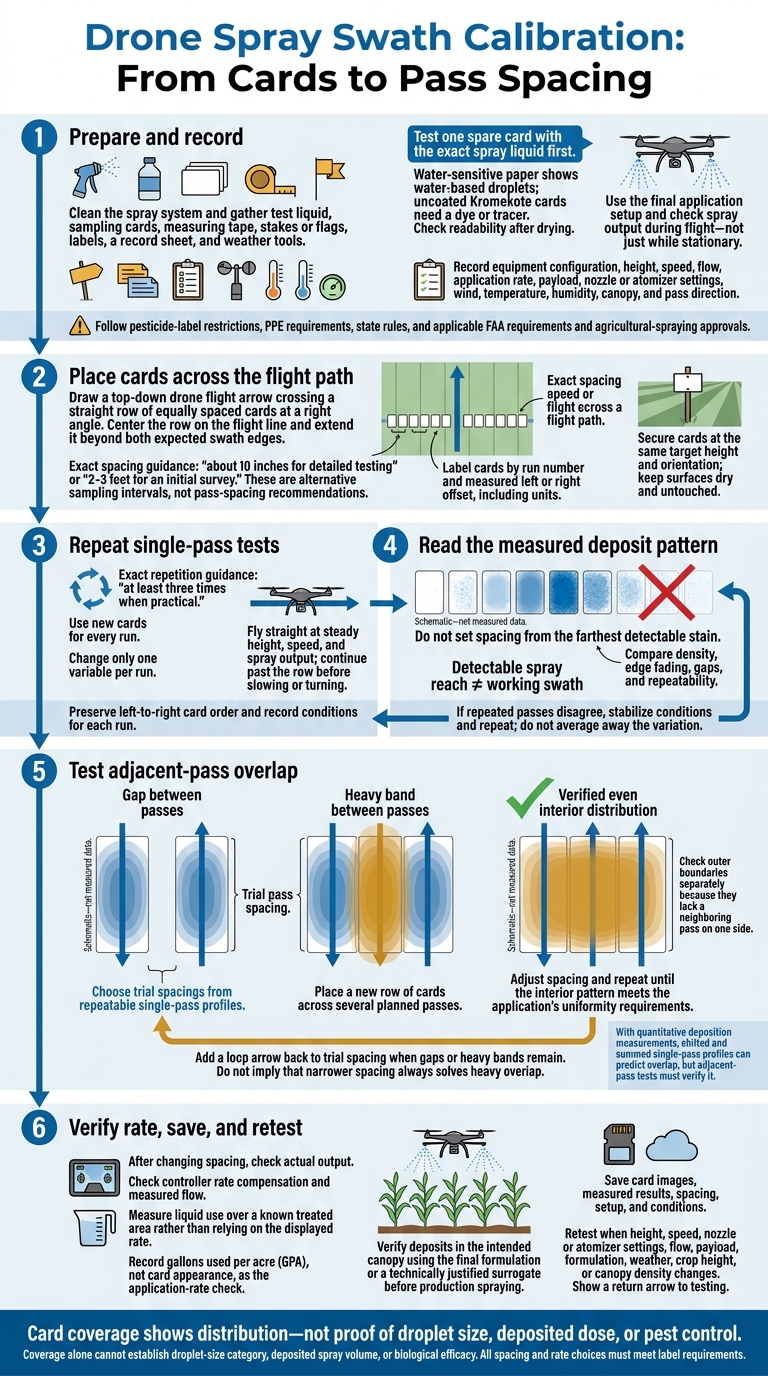
Drone Spray Swath Calibration: From Cards to Pass Spacing
Prepare for Swath Calibration
Gather Supplies and Record Spray Settings
Set up each test run so you can measure swath width without other variables affecting the results. Clean the spray system, then gather the drone, test liquid, sampling cards, measuring tape, stakes or flags, labels, a record sheet, and weather tools.[1] Use these supplies to keep card placement, labeling, and comparisons consistent across runs.
Test one spare card with the exact spray liquid first. Water-sensitive paper shows water-based droplets, while uncoated Kromekote cards need a dye or tracer. Check that the marks remain readable after drying.[7]
Use the final application setup. Record the drone model, firmware or flight-control mode, nozzle arrangement, and terrain-following setting. Check spray output during flight, not just while the drone is stationary.[7]
Keep a separate record for each run. Include the date, time, liquid, and tracer, along with:
- Height above target, flight speed, flow rate, application rate, payload, and nozzle or atomizer settings.
- Wind speed and direction, gusts, temperature, humidity, canopy height and density, and pass direction.
Use feet and inches, mph, gallons per minute, gallons per acre, and °F. Note how rotor wash bends or opens the foliage, then compare those observations with the deposit patterns.[7]
Choose a Safe Test Area
Choose an open, reasonably level site where you can measure the full spray spread without drift or obstructions. Leave enough room for the approach, test pass, and stopping distance.
Mark boundaries to keep people, animals, vehicles, water bodies, homes, and sensitive crops outside the test zone. Follow pesticide-label restrictions, required PPE, state rules, and applicable FAA requirements, including any additional agricultural-spraying approvals.[8][9][10]
Before setting production spacing, verify deposits in the intended canopy using the final formulation or a technically justified surrogate. Formulation properties can change how the spray behaves.[6]
sbb-itb-3b7eef7
Spray Drone Swath Test: T100, T60, T25 (CV Data)
Place Sampling Cards Across the Flight Path
Use the marked test lane to measure the full deposit pattern from edge to edge.
Space Cards at Equal Intervals
Set a straight row of cards perpendicular to the flight path. Center it on the flight line and extend it beyond both expected swath edges.[1][12][13] This setup shows where coverage stays even and where it drops off.
Keep spacing equal: about 10 inches for detailed testing or 2–3 feet for an initial survey.[11][12][13] Place cards closer together where deposits change sharply.
Label each card with its run number and measured left or right offset, including units. Sketch the card positions. Secure all cards at the same target height and orientation so rotor wash can’t move or fold them. Keep the surfaces dry and untouched before the pass.
Repeat Each Test With New Cards
Fly straight across the row at a steady height, speed, and spray output. High-capacity models like the ABZ Innovation L30 simplify this by maintaining consistent flow rates across large areas. Continue past the row before slowing or turning.[12][13] Use new cards for every run, repeat each setting at least three times when practical, and change only one variable per run.[12][13]
After the pass, collect cards by their edges. Keep each run separate and protect the cards from moisture and smearing. Preserve their left-to-right order so a handling mix-up doesn’t look like a change in the spray pattern.
Track Height, Wind, and Rotor Wash
Record the run number, flight direction, wind direction and speed, height above the target, and tank load. Note gusts and whether the pass is upwind, downwind, or crosswind. These details help explain changes in deposit shape - not just the amount deposited.
Rotor wash and forward motion can shift spray beneath and outside the aircraft. Crosswinds can push the pattern sideways. Test height changes only within aircraft limits and label requirements; flying higher can increase drift more than usable swath.[14]
Check promising bare-ground patterns again at crop target level, where foliage changes airflow and spray interception.[2] Use the recorded conditions to compare runs made under the same conditions.
Compare Deposits to Find the Usable Swath
Once you’ve collected the cards, read the pattern from center to edge. Check each card for deposit density, fading at the edges, and gaps before choosing trial spacing.[1][5]
Do not set spacing from the farthest detectable stain. That stain marks a boundary - not the working swath. Start with the single-pass pattern, choose trial spacing, then check overlap between adjacent passes. Set spacing based on their combined pattern, not how far a single pass reaches.[1][13]
Do Not Use Coverage to Infer Droplet Size
Coverage alone cannot establish droplet size, droplet-size category, deposited spray volume, or biological efficacy. Use it to assess spacing - not to interpret label droplet requirements or make efficacy claims.[16][2]
Match Deposit Patterns to Test Adjustments
Keep single-pass observations separate from adjacent-pass results. If repeated runs disagree, resolve the variation before choosing spacing. Don’t average it away.[13]
Use the pattern to choose your next spacing test. One pass alone isn’t enough to identify the cause.
| Observation | Possible cause to test | Adjustment to test |
|---|---|---|
| Heavy center band in a single pass | Height, airflow, nozzle position, flow, speed, or formulation | Change one variable; check adjacent-pass overlap |
| Sparse single-pass edges | Weak outer deposits | Test narrower spacing |
| Gap between adjacent passes | Poor overlap, misalignment, or uneven delivery | Check delivery and alignment; narrow spacing if needed |
| Heavy bands between adjacent passes | Excessive overlap or edge-heavy deposits | Review the single-pass pattern; adjust spacing |
| Inconsistent repeated passes | Variable wind, height, speed, payload, or flow | Stabilize conditions; repeat with new cards |
Set Pass Spacing and Check Overlap
Once you’ve mapped the single-pass pattern, use it to set centerline spacing. Base spacing on the measured pattern and overlap between adjacent passes - not maximum spray reach. Overlap can help distribute spray more evenly, but poor spacing can leave gaps or heavy bands.[1][7]
Choose Trial Spacing From Single-Pass Results
Choose trial spacings from repeatable single-pass profiles. If you have quantitative deposition measurements, shift copies of the profile by each proposed spacing, then add the deposits to predict overlap. Use those estimates as a starting point, and check the results with adjacent passes.[7][15]
Verify Spacing With Adjacent Passes
Enter the trial spacing in the DJI Agras T50 flight controller. Place a new row of cards across several planned passes, then fly enough passes to compare interior centerlines and overlap zones. Check the outer boundaries separately: they have no neighboring pass on one side. Adjust spacing and repeat until the interior pattern meets the application’s uniformity requirements.[7]
After changing spacing, check actual output. Check controller rate compensation and measured flow to maintain the intended gallons per acre (GPA). Measure liquid use over a known treated area rather than relying on the displayed rate.[1]
Any spacing change must still meet label requirements for rate, minimum carrier volume, and application conditions.[17][3]
Retest After Equipment or Field Changes
Recheck the pattern whenever height, speed, nozzle or atomizer settings, flow, payload, formulation, weather, crop height, or canopy density changes. Similar retesting is required when switching to a granular spreading system. Height and rotor airflow can alter deposition, so retest in the crop canopy - not just over bare ground. Record the setup, conditions, spacing, and results.[2][4]
Conclusion: Save Settings and Recheck as Conditions Change
Save a calibration record that connects card placement, repeated single-pass tests using new cards, deposit comparisons, selected spacing, and adjacent-pass results. Record the application rate from gallons used per acre - not card appearance.
Store card images and measured deposit results alongside the test date and time, field, crop, flight height (ft), ground speed (mph), flow rate (gal/min), pass spacing (ft), and spray configuration. Include wind speed and direction, temperature (°F), relative humidity, crop height or canopy condition, and any rotor-airflow or terrain effects. These details give you a clear baseline for later tests.
Treat saved settings as condition-specific. If DJI Agras T40 equipment, weather, or crop conditions change, compare a new test against that baseline before using the same spacing. Card coverage shows distribution only; it does not prove droplet size, deposited dose, or efficacy.
FAQs
How can I quantify uneven coverage across sampling cards?
Set water-sensitive paper perpendicular to your flight path, spacing the cards 1 to 3 feet apart across at least twice the expected swath width.
After a test flight, compare the density and distribution of blue stains across the cards. Calculate the coefficient of variation (CV); industry standards generally target 25% or lower. If you spot gaps, streaks, or uneven deposits, adjust your flight altitude, speed, or pass spacing.
How should I adjust spacing for sloped fields?
Keep your drone at a consistent height above the crop canopy for even spray deposition. Turn on terrain-following mode so it adjusts altitude automatically as the terrain changes.
Set pass spacing using the measured effective swath width, typically 65%–75% of the manufacturer’s maximum, rather than the advertised width. Enter that measured width into your flight planning software with 10%–30% overlap to account for terrain changes and avoid gaps or over-application.
What should I check if narrower spacing leaves heavy bands?
Heavy spray bands after you narrow pass spacing point to too much overlap between flight paths. Spray patterns are usually densest in the center and taper toward the edges. When passes are too close together, those concentrated areas overlap.
Increase pass spacing until deposits are even across the test area. Use your water-sensitive paper samples to confirm even deposits and overlap within the recommended 10% to 30% range.
