



Call or Text: +1 (208) 425-2990
Email: Sales@DroneSprayPro.com

7 Checks Before Stress Maps Guide Drone Spray Rates
I use stress maps to guide scouting - not to set spray rates on their own. Before approving a prescription, I check all 7 items below. If one fails, I hold approval.
- Image quality: Check for gaps, blur, shadows, and map errors.
- Map timing: Confirm the image date and any field changes since then.
- Boundaries: Verify field edges, buffers, and no-spray areas.
- Field scouting: Identify the cause of stress and confirm whether treatment is needed.
- Product rules: Check the label, aerial-use directions, and other restrictions.
- Zone rates: Verify product dose, spray volume, prior use, and sprayer drone equipment limits.
- Controller files: Test that zones, rates, and exclusions load and work as planned.
My rule: stress does not mean “apply more.” I record all seven checks before signing off - and keep <u>prescription approval separate from clearance to spray</u>.
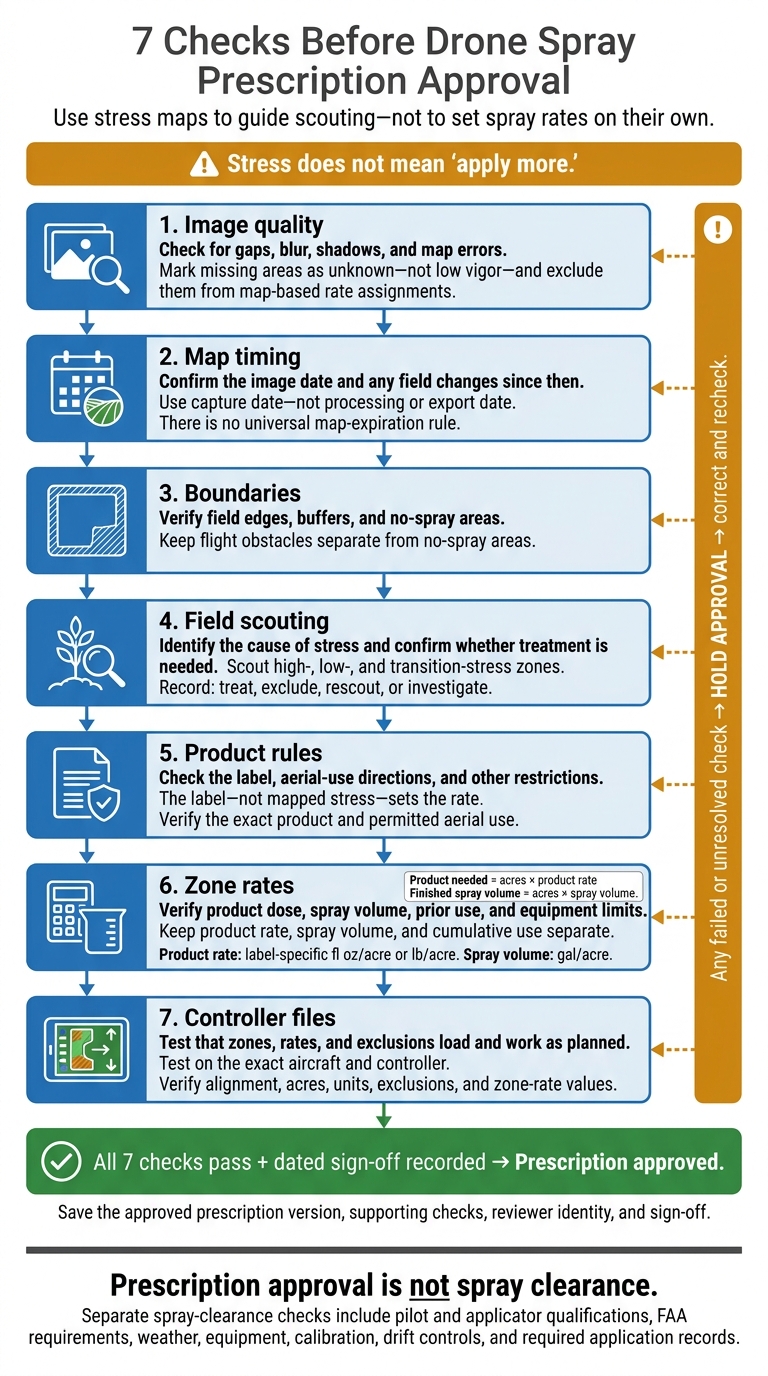
7 Checks Before Drone Spray Prescription Approval
Variable Rate Spraying | Agras Drone Tips
sbb-itb-3b7eef7
1. Check Source Image Quality
Check the source image before reviewing zones. RGB imagery shows visible crop and soil conditions. Multispectral imagery supports vegetation indices, while thermal imagery can show temperature patterns. Record the sensor, bands or index formula, capture date and time, crop stage, and image resolution.
Compare the original imagery with the processed map. Look for clouds, haze, smoke, shadows, glare, wet foliage, and blur. Turn on any quality or no-data masks, then check for blank pixels, missing tiles, stitching seams, duplicated rows, and warped edges. Mark missing areas as unknown - not low vigor - and exclude them from map-based rate assignments.
Next, check calibration and alignment. Confirm reflectance calibration and irradiance or panel records. For thermal imagery, verify temperature calibration and emissivity settings. Flight lines should line up without offsets or brightness jumps. Investigate patterns that follow image seams or flight lines before turning them into treatment zones.
Match image resolution to the task. Broad patterns can guide scouting, but narrow weed patches need finer imagery. Don’t make zones smaller than the image can resolve or the drone can reliably treat. Upscaling does not add detail.
Compare image patterns with soil, drainage, irrigation, and field operation records. Save notes and screenshots of the review. Pass the image only when zones make agronomic sense, gaps are corrected or excluded, and image defects do not drive rate decisions.
2. Check Map Dates and Field Changes
Once image quality passes, check whether the map still reflects the field. Judge map age by capture date - not processing or export date. Verify the capture date, any multi-image date range, processing date, prescription creation date, controller export date, and latest scouting date. Do not use a map if its capture date is unknown.
There is no universal map-expiration rule. A map’s useful life depends on crop stage, the mapped condition, weather, and field activity. Compare the crop stage at capture with the current stage. Fast growth or canopy closure can change what the map represents. Crop-stage restrictions also determine whether treatment is allowed.[4][6][7]
Review field records from image capture through the planned application. Check rainfall, irrigation, heat, drought, flooding, frost, and storms, along with cultivation, mowing, fertilizer applications, previous sprays, harvest, and replanting. Did these events remove the original stress, shift its boundaries, or create a new problem?
Scouting is the final field-level check before prescription approval. Require current scouting at representative points in every mapped zone, including zone edges. Record crop stage, target presence, severity, pest life stage, and dated photographs. Confirm that the target is still present, treatment is justified, and the mapped stress matches current field conditions.
Approve the map for rate review only when scouting confirms that the zones still match field conditions. Update zones where boundaries or severity have changed. Reject the prescription if treatment has already corrected the target, field changes have made it obsolete, or scouting cannot confirm it. Save the decision, reason, reviewer name, and map revision with the application records.
3. Verify Field Boundaries and No-Spray Areas
After scouting confirms the stress zone, check the boundary that will guide the flight and define where the prescribed rate can be applied. Compare the prescription map with the latest boundary layers and imagery, using farm GIS layers and RTK boundary data where available. Then drive around the field to confirm the mapped edge. Check corners, headlands, lanes, terraces, and drainage. Recalculate treatment acres after subtracting exclusions, and compare the total with the crop plan. Acres shown on a screen don’t prove the boundary is correct.
A field boundary is not a legal spray boundary. Turn label and regulatory restrictions - including state rules and federal restriction layers - into mapped no-spray areas.[9][11] Measure each buffer from the feature named in the restriction, not the field edge. Some labels measure from the downwind edge of the last spray pass.[10][8] Use the table below to distinguish boundary errors from flight hazards.
| Map feature | What to verify | Required correction |
|---|---|---|
| Field edges and headlands | Crop edge and acres | Redraw boundary; recalculate acres |
| Waterways, ditches, ponds, and wetlands | Protected edge and buffer | Map product-specific exclusions |
| Roads, occupied structures, and public areas | Location and access | Add required exclusions and safe routing |
| Neighboring crops and livestock areas | Use and boundaries | Map required setbacks or exclusions |
| Power lines, trees, poles, and irrigation structures | Position, height, and clearance | Mark obstacles; revise route |
| Workers and temporary equipment | Location and movement | Delay application or revise mission |
Keep flight obstacles separate from no-spray areas. An obstacle layer does not automatically create a pesticide buffer, and a no-spray polygon does not guarantee aircraft clearance. Some features, such as occupied structures, need both protections. Record coordinates and take photographs of corrections so the map can be updated accurately.
Where suitable RTK boundary data are available, check the survey date, coordinate reference system, datum, and units. Confirm whether the points mark the legal boundary or the crop edge used for field operations. RTK improves edge placement; it does not identify new hazards or determine label-required buffers.
Once the geometry is correct, check the mission file before export. Approve it only when the mission file and every exported boundary or exclusion file match the approved geometry. On the controller, check alignment, closed polygons, visible exclusions, treatment acres, protected turns, and narrow passes. Fix any missing, shifted, or outdated layer before approval. Save the corrected file, inspection date, buffer source, and reviewer name.
4. Confirm Map Zones With Field Scouting
After checking boundaries, verify the mapped zones in the field before setting a rate. Scout high-, low-, and transition-stress zones, not just the worst patches. Compare affected and unaffected plants at the same crop stage. Check whether transition points show a change in crop condition or an imaging artifact. Use imagery to guide scouting, not to diagnose the cause.[17][18]
At each stop, record crop stage, stand density, canopy condition, symptoms, weed species and growth stage, pest counts, and disease signs and severity. Follow crop-specific pest-counting methods, note affected plant parts, and compare findings with local economic thresholds when available.[12][14][15] Also record whether the crop and target stages fit the intended treatment window.[13]
Before marking a zone for spraying, check roots, soil moisture, drainage, irrigation performance, planting history, fertility, pesticide history, and traffic. Similar map patterns can point to different causes. Minnesota Extension reports that many crops begin experiencing water stress at approximately 30%–50% depletion of plant-available water. Check moisture before assuming that spraying will address the stress.[19] If weather, soil, or other growing conditions caused the stress, hold the zone rather than assign a higher spray rate. Professional agricultural spray drone services can help calibrate these decisions based on local field conditions.
Stress alone does not justify a higher rate. Confirm that the proposed product addresses the observed cause. Drought, compaction, poor drainage, or stand loss should not automatically trigger a pesticide-rate increase. Every rate decision must match the identified target, treatment timing, and product label.[13][16]
Record the date, time, scout, zone ID/GPS, crop stage, target, severity/count, soil or growing-condition findings, photos, and decision: treat, exclude, rescout, or investigate. Approve a zone only when field findings support both the mapped stress and the intended action. If those findings disagree with the map, hold the affected zone and recheck image timing and quality before assigning a rate.
5. Verify Product Labels and Application Rules
Once scouting identifies the target, check the exact product formulation and any supplemental labeling. The label - not mapped stress - sets the rate. Confirm that the product is registered in the field’s state and that the scouting diagnosis matches the label’s approved crop/site and target. Record the product name, EPA registration number, label revision or retrieval date, and state registration status. Keep supplemental labeling with the operator during application.[2][3][20]
The label doesn’t have to name drones, but it must support the planned aerial use. Check that its aerial directions cover the proposed aircraft, equipment, and application method, including how prop wash affects deposition. If the wording is unclear, hold approval and contact the state pesticide regulator. FAA authorization does not override pesticide-use restrictions.[21]
| Label requirement | Prescription setting affected | Operator confirmation |
|---|---|---|
| Approved crop, site, and target | Eligible zones and treatment layer | Confirms the scouting diagnosis matches the label |
| Aerial use directions | Application method, flight height, swath, and equipment limits | Confirms the planned aerial method is permitted |
| Product rate and seasonal maximum | Zone rate and cumulative-use limit | Verifies the rate per acre and remaining seasonal allowance |
| Spray volume and nozzle requirements | Tank volume, flow rate, nozzle selection, and flight speed | Calibrates output and verifies the required droplet size |
| Adjuvant and tank-mix directions | Mission mix recipe and loading sequence | Confirms compatibility, mixing order, and required adjuvant |
| REI and PHI | Job timing and field-access restrictions | Records worker-entry and harvest dates |
| Buffers and sensitive sites | Label buffer distances and sensitive sites | Confirms the map matches the label’s exact setbacks |
| Weather and site restrictions | Application hold rules and operating window | Checks wind, inversion risk, rainfall, humidity, and site conditions |
| Operator credentials and records | Required licenses, documentation, and reporting fields | Confirms credentials and required records |
Build these requirements into the prescription as hard limits, not optional notes. Include any applicable EPA Endangered Species Protection Bulletin restrictions.[11] Before releasing the application, recheck actual weather at the site. A forecast alone does not establish compliance.[22]
Before approval, mark each requirement pass, hold, or reject. Save the operator’s identity, field ID, prescription version, planned application date, and supporting label documents. Pass only when every applicable requirement has been verified; place any uncertain item on hold.
6. Verify Product Rates and Spray Volumes by Zone
Once label limits are confirmed, convert them into exact rates and volumes for each zone. Keep product rate, spray volume, and cumulative use separate. Record product rate in the label’s units - fl oz/acre or lb/acre - and carrier volume in gal/acre. Calculate product needed as acres × product rate and finished spray volume as acres × spray volume. More carrier does not permit more product. Less carrier must not produce a concentration the label prohibits.[4][6][24]
Use a zone-level review sheet linked to confirmed scouting targets. Record the exact product-specific limits for each zone.
| Zone | Mapped condition and confirmed scouting target | Planned product rate | Applicable label rate limits | Spray volume | Pass/fail |
|---|---|---|---|---|---|
| Each treated zone | Mapped condition and confirmed scouting target | Dose in label-specific fl oz/acre or lb/acre | Single-application range, maximum active ingredient or acid equivalent rate, maximum application count, minimum retreatment interval, and seasonal maximum | Gal/acre; check minimum carrier volume and concentration | Pass only if every limit and delivery check complies |
| Previously treated zones | Current zone plus prior use | Proposed dose in label units | Check cumulative use, timing, and application count | Confirm the mix remains allowed | Fail if any cumulative limit is exceeded |
| Excluded zones | Scouting does not justify treatment | 0 rate | No application planned | 0 gal/acre | Pass only if excluded from spraying |
For every treated zone, check the remaining seasonal allowance, not just the planned dose. The treatment ledger should record prior application dates, rates, application counts, and active ingredient amounts. Include acid equivalent amounts when the label uses that basis, plus soil, foliar, and seed-treatment use when required. Check all limits against the planned application date.[4][6][23]
Confirm that one tank mix can deliver every zone rate. With a fixed mixture, changing flow changes both product dose and spray volume. Document the product, carrier, and final mixture amounts for each recipe. Use a stationary flow test and a brief field test to check zone-rate delivery across planned speeds, swath widths, and flow settings. Required output must stay within pump, nozzle, tank, and droplet limits.[24] Export only after all zone calculations pass.
Approve only when every zone and cumulative-use total passes. Hold unresolved calculations for review; fail any confirmed violation or delivery shortfall. Keep the approved prescription version, label, zone calculations, treatment ledger, calibration results, and application records. Recheck the calculations after any rate or controller change.[1][24]
7. Test Prescription Files on the Drone Controller
After rate approval, test the file on the exact aircraft and controller. Check that it works with the software version and application mode. Even common formats - Shapefile, KML, GeoJSON, GeoTIFF, and ISOXML - may not be supported. Confirm the required file type, folder structure, naming rules, size limit, and coordinate system. Also check whether boundaries and rates need separate files.[26][28][29]
Before uploading, verify the coordinate reference system, datum, coordinate units, pixel orientation, and georeferencing method. During import, check that the raster’s world file or embedded georeferencing places it correctly and that latitude and longitude aren’t swapped. Validate displayed values against a zone-to-rate key, keeping zero-rate zones, no-spray areas, and outside-field data separate. Reproject unsupported coordinates before import; don’t expect the controller to correct them.[26]
Use this test sheet to check more than whether the file imports. Confirm that it loads and displays correctly:
| Map output | Required drone file | Rate unit | Boundary status | Import result | Correction needed |
|---|---|---|---|---|---|
| Variable-rate zones | Supported prescription file; boundary if required | Controller-compatible rate unit | Field edge and internal zones | Zone count, values, and mapped acres | Missing zones, encoding, or units |
| Spot-spray targets | Supported spot-spray file | On/off or product rate | Targets, gaps, and exclusions | Targets remain separate | Filled gaps or missing targets |
| Georeferenced raster | Required raster and world file, if specified | Source values match controller units | Alignment with known points | Alignment and upload status | Projection, dimensions, or file size |
Transfer files using the documented method and keep the folder structure intact. Confirm any required login or cloud sync before opening the field on the controller. Once the file passes import checks, review the mission before flight. Inspect every corner, headland, zone, and exclusion. Compare boundaries with live GPS or RTK at known points, and check the planned swath - not just the polygon. Run a short simulation or non-spraying test to check alignment, inactive gaps, zone crossings, and behavior outside the polygon.[26][27][28]
Pass the file only when every zone survives import and the displayed values match the approved plan. Acres and rates must match without unexplained conversions. Check source-unit and resampling settings that could change rate values. Record the file name, export date, coordinate system, aircraft, controller, software version, operator, and fixes to document that the approved file matched the controller display. Hold the mission if boundaries shift, zones disappear, or rates cannot be reconciled.[25][28][2]
Conclusion: Record All 7 Checks Before Approval
Keep approval pending until all seven checks pass: valid imagery, current field conditions, verified boundaries and exclusions, scouting-confirmed zones, label-compliant use, zone-rate compliance, and successful controller import. Record the approval before any file leaves review.
Keep one dated sign-off record as proof of completion. Include the map capture date; imagery source and resolution; field ID and acres; crop and growth stage; product and label rate range; prescription filename, version, export date, and software; boundary and exclusion confirmation; scouting record; controller import confirmation; approver identity and sign-off; and unresolved risks. Attach the approved file and import evidence so no one mistakes a later edit for the signed version.
Prescription approval is not spray clearance. Approval ends here; spray authorization is a separate process. Complete separate checks for pilot and applicator qualifications, FAA requirements, weather, equipment, calibration, drift controls, and required application records. Agricultural drone spray operations are subject to applicable Part 137 requirements.[1][5]
FAQs
What if scouting and my stress map disagree?
Walk the flagged zones and inspect the plants and soil. Multispectral maps guide where to look, but field noise, irrigation issues, soil compaction, or sensor errors can affect the results.
If the map shows stress but the plants and soil look healthy, adjust the detection thresholds. If scouting reveals problems the map missed, refine the classification settings before finalizing your prescription. Always verify the map’s georeferencing so the drone treats the correct location.
When should I replace a map instead of updating zones?
Replace the map rather than update its zones when differences between the map data and current field conditions are too large to fix with simple adjustments. This includes scouting that shows the imagery no longer matches the field, persistent sensor errors, incorrect georeferencing, or major shifts in the coordinate reference system.
If the map doesn’t line up with fixed features, such as field edges or roads, create a new map with accurate georeferencing.
What if my drone cannot deliver an approved zone rate?
Check the drone’s calibrated delivery range and the pesticide label’s limits. Before building the prescription, confirm that the drone and controller support the required boundaries and rate changes. Make sure the pumps and nozzles can deliver the target rates at your planned speed and swath width.
If the prescription exceeds the system’s capacity, adjust the source zones, re-export, and repeat the import checks. Keep all rates within label limits and supported by agronomic evidence.