
Call or Text: +1 (208) 425-2990
Email: Sales@DroneSprayPro.com

XAG battery faults: software checks and resets
If an XAG battery shows a fault, I don’t reset it first - I read the fault, check the live data, and decide if the pack should stay in service. That one step can prevent a grounded job, a mid-flight shutdown, or a pack that should never be charged again.
Here’s the short version:
- Red flash patterns often point to heat, cold, or pack failure
- Green lock patterns often mean the battery is locked and needs support
- Cell spread matters: about 0.01–0.03 V is normal at rest; 0.10 V+ means stop use
- Temperature spread matters: about 5°C / 9°F or less is common; 10°C / 18°F+ is a warning sign
- Only reset charger, power, or communication faults after readings look normal
- Do not return a pack to use if it still shows lock status, cell imbalance, repeated voltage/current faults, swelling, leakage, or heat damage
I treat XAG battery faults in three groups: temporary protection, connection or charger faults, and hard lock or malfunction states. Temporary heat or cold states may clear after the pack returns to a safe range. Connection faults may clear after cleaning contacts, reseating the battery, and restarting the charger. But a double red flash, a remote lock, or an anti-dismantling lock is a stop sign, not a reset job.
Before any reset, I check:
- battery LEDs
- the app warning
- the charger message
- total pack voltage
- highest and lowest cell voltage
- cell-voltage spread
- pack temperature
- whether the same fault has shown up in past logs
If the numbers are normal and the fault was tied to contact or communication, I can try the approved restart flow. If the pack stays locked, shows one weak cell, has a wide voltage gap, or runs hotter than the rest, I tag it Do Not Use and move it out of service.
This article is about using software checks and approved reset steps to make that call fast and safely.
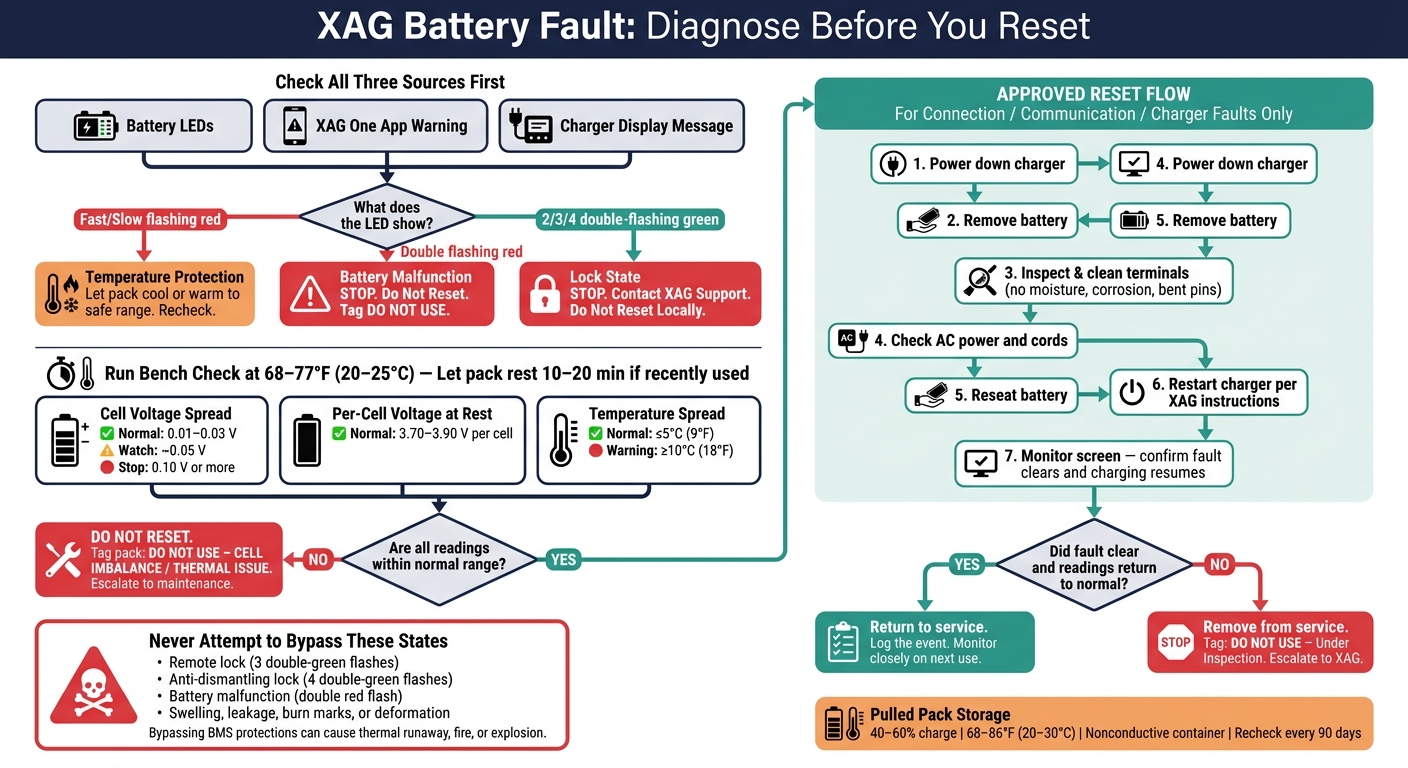
XAG Battery Fault Diagnosis & Reset Decision Flow
Read the fault first: LEDs, app warnings, and charger screens
Start by reading the battery. XAG smart batteries can show faults in three places: the battery LEDs, the XAG One app, and the charger display. The same issue may show up a little differently in each one, so it helps to check all three. A good flow is simple: look at the LEDs first, then verify the fault in the app and on the charger screen.
Battery LED patterns and lock states
On packs like the B141050 Smart SuperCharge Battery, green LEDs usually show battery level and lock states. Red LEDs are more often tied to temperature protection, malfunction, short-circuit, and abnormal plug temperature conditions.[1] The catch is that LED meanings can change by battery family and product generation. So before you act, match the pattern to the exact battery model and its manual.
| LED Pattern | Condition | What It Means |
|---|---|---|
| Fast flashing red | Overheating protection | Pack is temperature-locked until it cools. |
| Slow flashing red | Low-temperature protection | Pack must warm above 50°F (10°C) before charging. |
| Double flashing red | Battery malfunction | Stop using the pack; service required. |
| Triple flashing red + triple flashing green | Abnormal plug temperature or short-circuit protection | Contact technical support. |
| 2 double-flashing green | Locked fault state | Low battery or excessive voltage variance; requires technical support. |
| 3 double-flashing green | Remote lock | Battery locked remotely; requires technical support. |
| 4 double-flashing green | Anti-dismantling lock | Cell identification failed; requires inspection. |
What matters most here is the difference between temporary protection states and hard lock conditions.[1] That split changes what you should do next.
A fast red flash right after a demanding flight often points to overheating protection. In plain terms, the pack got too hot and needs time to cool down. That kind of state can clear on its own.
A double-flashing red, or a green multi-group lock pattern, is a different story. Those signals usually mean the battery has moved into a protected or disabled state that does not clear by waiting around. Temporary protection may pass. Lock states need a different response.
Use the LED pattern to sort a short-term protection event from a real lockout.
Common warning messages in the app and on the charger
Watch for messages like battery locked, communication failed, battery too hot, battery too cold, abnormal battery connection, over-current, and over-voltage. These warnings help you sort the issue into one of three buckets: temperature, electrical trouble, or lockout.[7][9]
“Battery too hot” or “battery too cold” usually points to a temperature issue, not a failed pack. “Communication failed” or “battery offline” means something else. In many cases, the battery, charger, or dock isn’t exchanging data the way it should. That can come from dirty contacts, a loose or unstable connection, cabling trouble, or a software mismatch instead of a bad cell. A battery locked message is more serious. It means the pack has entered a protected state and may need an unlock process or service support to clear it.[7][9]
Charger fault codes need the same close read. If the charging-station display shows a fault, match the code to the exact message on screen before you try any restart.[8] That could be a connection error, a voltage protection event, an over-current alarm, a temperature alarm, or a charger-side communication fault. Why be so careful? Because a charger that keeps throwing a fault code may be reporting a battery lock, not a charger problem.
Write down the exact LED pattern and the exact app or charger message before you touch anything else.
If the pack is not locked, go to a software health check before trying any reset. Once you know what kind of fault you’re dealing with, check voltage, cell balance, and temperature before any reset.
sbb-itb-3b7eef7
Run a software health check before attempting a reset
If the battery is unlocked, do a bench check before you try any reset. That quick software review helps you tell the difference between a short-term issue and a pack fault that a reset won’t solve.
Do the check on a clean indoor bench at room temperature, 68–77°F (20–25°C). If the pack was just brought in from a hot or cold area, let it rest for 10–20 minutes before you read the data. Once the pack has settled, connect it to the approved XAG charger or interface, make sure the terminals are clean and tight, and open the diagnostics screen in the app.
Key values to review: pack voltage, cell balance, and temperature
Three readings matter most: total pack voltage, per-cell voltages, and pack temperature.
On a resting pack, cells should stay in a tight range, often around 3.70–3.90 V per cell. For a pack at rest, check the gap between the highest and lowest cell. A spread of 0.01–0.03 V is normal. Around 0.05 V should be watched. 0.10 V or more means stop and inspect.[10][12][13] If one low cell stays low even after charging and resting, tag the pack "DO NOT USE: CELL IMBALANCE" and send it toward inspection.
At rest, pack temperature should be close to the room around it. A spread of 5°C (9°F) or less is common. Around 10°C (18°F) or more points to local heating or a failing cell group.[10][11] That’s not something a reset is meant to fix.
A simple check sequence for operators
Start by connecting the battery the right way, then write down the baseline. Record:
- date and time
- battery ID
- total pack voltage
- lowest and highest individual cell voltages
- cell-voltage spread
- pack temperature
- the exact warning text shown in the app or on the charger
Then let the pack settle if it hasn’t already. If you’re dealing with a communication or contact fault, power it down, reseat the pack, clean the connectors, reconnect, and test again. If the warning disappears and the voltage and temperature numbers look normal, that usually points to a seating or contact issue, not a pack fault.
If the readings still sit outside the allowed range after a retest, stop there. Check your numbers against the limits above. Ongoing cell imbalance, one low cell, or an odd temperature spread means you should not move to a reset. Mark the pack, log the result, and pass it to your maintenance team or a qualified service provider. If the same fault shows up across three logs, take the pack out of service for inspection.[14][15]
Allowed resets and when to stop
If the readings look normal, you can move from diagnosis to a reset only for faults tied to connection, power, or communication issues. That line matters. Not every app or charger error should be reset and sent back into use.
The goal is simple: separate short-lived faults you can clear on-site from protection states that need support.
Safe reset steps for transient charger or connection faults
Transient faults usually come from loose connections, a short power drop, or small battery-to-charger communication errors. If your software health check shows normal voltage, balanced cells, and stable temperature - and the fault clears after you fix the physical cause - you can deal with it on-site.
Here’s the basic flow:
- Power down the charger.
- Remove the battery.
- Inspect the terminals and battery bay for dirt, moisture, corrosion, burns, or bent pins.
- Clean only with manufacturer-approved methods.
- Check AC power, plugs, and cords for instability.
- Reseat the battery.
- Restart the charger based on XAG's instructions.
- Watch the screen for the fault to clear and for charging to return to normal.
If charging resumes normally, log the event and keep an eye on that pack during later use.
If the charger shows a controller fault, startup error, or internal communication failure, stop there. Unplug it, tag it Out of Service, and record the code, date, time, and battery serial number. That charger needs support review before it goes back into rotation. Repeated restarts can damage otherwise healthy packs.[18]
When remote unlocks may be possible
If the fault is a lock state instead of a contact issue, local reset steps stop here.
XAG remote unlock needs a battery with enough charge, a powered-on drone, an internet connection, and cloud status active in the app.[17] After those conditions are met, send XAG the battery serial number, screenshots of the warning messages, and a short note explaining what happened before the lock showed up.
Do not try to bypass a remote lock, anti-dismantling lock, or battery malfunction lock on your own. Unapproved software, terminal jumping, or BMS bypassing shuts off safety protections and can lead to thermal runaway, fire, or explosion. It also voids manufacturer support and creates real liability exposure, especially for agricultural spray drone operations under FAA oversight. If XAG's telemetry review shows serious anomalies - very low cell voltages, extreme temperatures, or repeated faults - the pack will remain locked, and support will tell you to remove it from service.[17][6]
When to pull a battery pack from service
If the pack still shows a protected or unstable state after approved checks, remove it from service. Pull a battery right away when you see any of the following:
| Condition | What it signals | Action |
|---|---|---|
| Persistent lock status after authorized checks | Software or BMS protection that won't clear | Remove from service; escalate to XAG |
| Battery malfunction or double-flash fault | Internal cell or BMS failure | Stop use immediately[4][18] |
| Repeated over-current or over-voltage on the same pack | Internal cell or BMS issue, not external wiring | Remove from service |
| Severe cell imbalance | Cell degradation beyond safe flight threshold | Remove from service |
| Swelling, leakage, deformation, cracked housing, burn marks | Physical damage or thermal event | Remove from service; do not charge |
Once a pack is pulled, store it at 40%–60% charge in a cool, dry, well-ventilated area at about 68°F to 86°F (20°C to 30°C).[5][16] Put it in a nonconductive container, keep it away from flammables, and label it Do Not Use – Under Inspection/Failure Suspected. Recheck it every 90 days while it waits for review.[16][3][2][9] Keep the pack in a place where it can be moved fast if you notice abnormal odor, smoke, or rising temperature.
Conclusion: use software to decide, then escalate correctly
Start with the exact warning, then check the live battery data. After any approved reset, use the software result to make the final call. Read the LED pattern, app alert, or charger message first. Then match it against the live battery data in software.
If the warning clears after an approved reset and the readings go back to normal, return the pack to service with closer monitoring. If the fault stays locked, the numbers still look off, or the same fault comes back after a retest, remove the pack from service and tag it for inspection. If XAG confirms a remote unlock is allowed, follow the documented conditions exactly[19]. If the pack shows a malfunction lock or repeated red fault, stop using it at once[4][2].
Key takeaways for farm crews and drone spray operators
Careful software checks protect more than the battery. They also help keep the spray schedule on track by preventing avoidable mid-mission shutdowns and extra retries. Before every mission, use the same sequence:
- Note the exact fault indication
- Verify the health data
- Decide whether the issue looks temporary or persistent
- Use only documented reset steps
- Remove any pack that still shows a problem
Record what happened, label questionable packs, and tell the maintenance lead so the same fault does not get missed again.
If the pack still will not clear, stop using it and escalate it. For faults that do not clear after documented checks, escalate the pack for service review and replacement support.
FAQs
How do I know if a fault is temporary or a lock state?
Check your battery management system or monitoring app. A charger error once in a while, or a short drop in performance, can hint that the pack needs recalibration or some basic maintenance.
Treat it as a lock state if the same faults keep coming back, the pack loses charge fast while sitting, cell imbalance goes above 0.1 V, the behavior turns erratic, or it won’t balance the way it should. If a pack keeps showing safety warnings, isolate it and stop using it.
What readings should I check before resetting an XAG battery?
Before you reset an XAG battery, look at both the pack’s physical state and its software data. Don’t reset a pack if you see swelling, cracks, punctures, leaks, a loose housing, terminal corrosion, bent pins, or any dirt or residue on the pack.
In the app or battery monitoring system, make sure the temperature is within the maker’s stated limits and that the pack isn’t unusually hot. Then check the charge level, cell balance, and cycle count. Stop there if cell imbalance is more than 0.1 V, if the battery is losing charge too fast while sitting idle, or if flight time has dropped by 20% or more.
When should I stop using the battery instead of resetting it?
Stop using the battery at once and take it out of service if you spot any physical damage. That includes swelling or deformation over 3 mm, cracks, punctures, leakage, heat damage to wiring or connectors, or any unusual odor.
You should also stop using it if it keeps failing to hold a charge, doesn’t pass inspection, or shows error codes that stay on even after a power cycle and cooldown.
Do not repair or reuse the battery. Move it to a nonflammable area and follow the proper disposal protocols.
