Call or Text: +1 (208) 425-2990
Email: Sales@DroneSprayPro.com

Sprayer Calibration Checklist for Farmers
Sprayer drones can miss the target rate by more than you think if speed, pressure, or swath width is off. I’d keep this simple: check the hardware, test nozzle flow, confirm the actual spray width, match the setup to the target GPA, and do one short clean-water pass before loading product.
Here’s the main point in plain English: calibration is how I make sure the drone applies the right gallons per acre (GPA). If I skip it, I risk overapplying, underapplying, streaking, drift, and wasted product. And one small mistake can hit hard - for example, using Imperial gallons instead of U.S. gallons can skew the rate by 20%, and a worn nozzle can run 10% to 15% high.
Before spraying, I’d focus on these checks:
- Inspect the drone: props, battery pins, tank, hoses, clamps, filters, and valves
- Clear the spray system: rinse first and remove trapped air before testing flow
- Check nozzle wear: replace any nozzle running more than 10% above a new one at the same pressure
- Verify output: if measured flow is off by more than 5%, fix it before flying
- Measure usable swath: drone spray width may be only 65% to 75% of the listed maximum
- Confirm app settings: speed, altitude, nozzle count, swath width, and target GPA must match the tested setup
- Run a water-only test pass: look for even coverage, no gaps, and no streaks
One formula matters most for setup:
GPM = (GPA × MPH × Swath in inches) ÷ 5,940
That gives me the total flow rate I need. Then I divide by the number of active nozzles to get the target per nozzle.
This article walks through that full pre-spray routine so I can keep coverage even, rates close to target, and input costs under control.
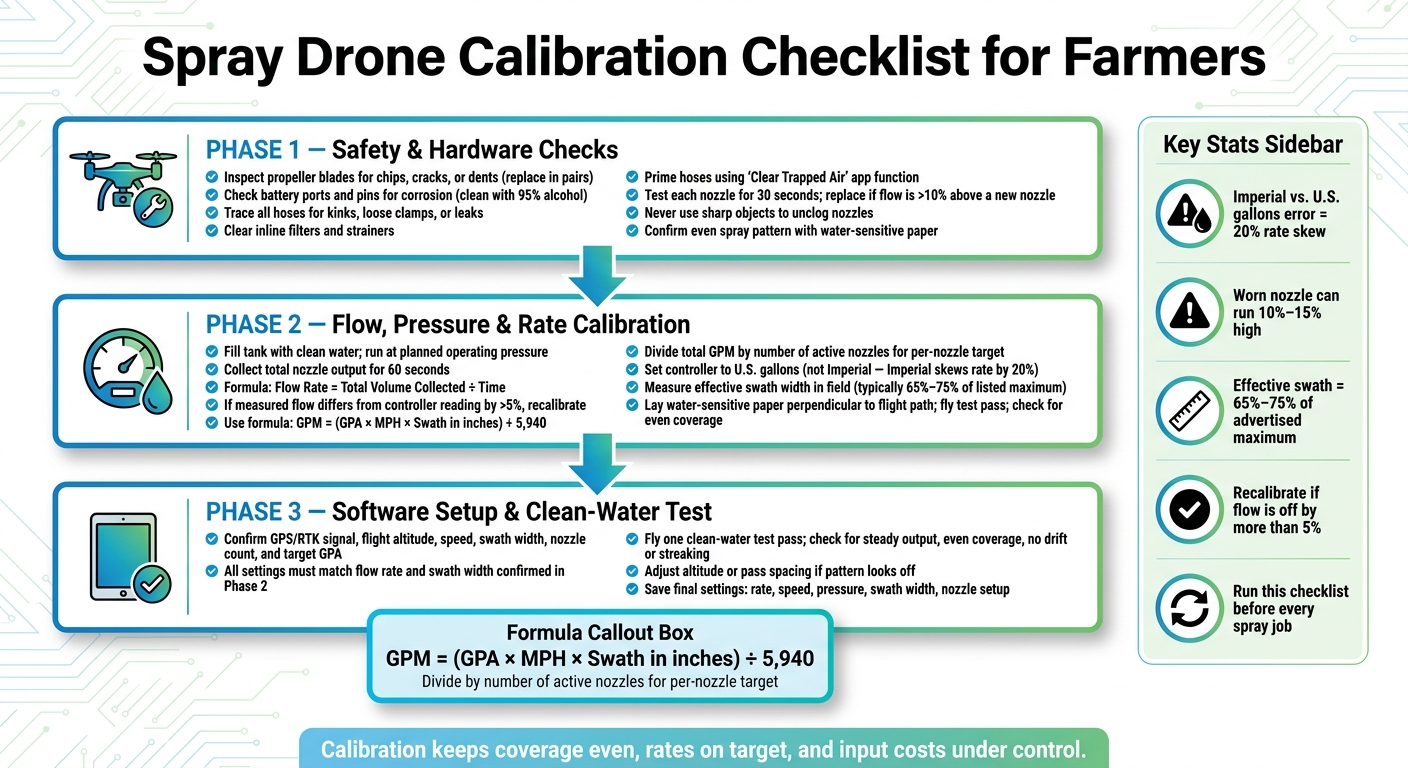
Spray Drone Calibration Checklist: 3-Step Pre-Spray Routine
How To Calibrate Sprayers XAG P150 Max

sbb-itb-3b7eef7
Checklist 1: Safety and Hardware Checks Before Calibration
Run this checklist before calibration. Rinse the system before testing so residue doesn't skew the results.
Check the airframe, battery, and controls
Inspect each propeller blade for chips, cracks, or dents. If you spot damage, replace propellers in pairs and install new gaskets to keep the system balanced [2].
Check the battery ports and pins closely for corrosion. If it's minor, clean it with 95% alcohol and a cotton swab before connecting the battery [2].
Check the tank, hoses, filters, and valves
With your agricultural spray drone on the ground, fill the tank with clean water and trace every hose from the tank to the nozzles. Look for kinks, loose clamps, or fittings with leaks.
Check all inline filters and strainers for debris. Then prime the hoses with the app's "Clear Trapped Air" function before flow testing. After the fluid path is clear, check nozzle output and spray pattern.
Check nozzle condition and wear
Inspect each nozzle for visible cracks, residue buildup, or deformation. Run each nozzle for 30 seconds with clean water and collect the output [1]. If any nozzle's flow rate is more than 10% above that of a new nozzle of the same type at the same pressure, replace it before calibration continues [1].
If a nozzle is clogged, clean it with a soft brush only.
"Never use sharp objects (such as wires or knives) to unclog nozzles. They will damage nozzle orifices, which will affect the spray pattern." - Purdue Pesticide Programs [1]
Use water-sensitive paper to confirm an even pattern before flow and pressure calibration.
When the hardware checks pass, move to flow, pressure, and rate calibration.
Checklist 2: Calibrate Flow, Pressure, and Application Rate
With the pump, filters, and nozzles checked, the next step is calibration. The goal here is simple: make sure the spray output and field coverage match your target rate.
Check the flow meter and pump
Start by filling the tank with clean water. Run the system at your planned operating pressure, then collect the total nozzle output for 60 seconds.
Use this formula: Flow Rate = Total Volume Collected ÷ Time.
Then compare the measured flow with the controller reading. If the gap is more than 5%, recalibrate before spraying. Purge air from the lines first, then test output at each pressure you plan to use.
"The primary goal of calibrating a spray drone is to determine the actual rate of application in gallons per acre, and then to make the necessary adjustments if there is a difference greater than 5 percent." - Purdue Pesticide Programs [1]
Set pressure and confirm target GPA
After you check the flow meter, match your low-flow nozzles to the total flow needed for your GPA target. Use this formula to find the total flow rate:
GPM = (GPA × MPH × Swath in inches) ÷ 5,940
Next, divide that total by the number of active nozzles to get the per-nozzle target [1][3]. Set the controller to U.S. gallons.
When the flow lines up with the target, adjust speed and swath so the system delivers the right GPA. This is where small settings can make a big difference in the field.
Measure swath width and spray pattern
Now check the spray pattern in the field. Use your measured effective swath width in GPA calculations, not the advertised maximum [1].
A simple way to test it:
- Lay water-sensitive paper or white paper tape perpendicular to the flight path
- Fly one test pass with clean water or water with dye added
- Check for even coverage with no center gaps or edge streaks
If the spray deposit looks uneven, adjust flight altitude or pass spacing before moving on.
Checklist 3: Software Setup and Clean-Water Test
Once flow and swath are dialed in, the next step is to lock down the software settings and confirm everything with a short water test.
Calibrate sensors and confirm mission settings
Before the test flight, check the controller and make sure the GPS or RTK signal, flight altitude, speed, swath width, nozzle count, and target GPA all line up. These settings should match the flow rate and swath width you already confirmed in Checklist 2.
Run a short clean-water test flight
Fly a single pass with clean water and watch for steady output, even coverage, and no drift, streaking, or missed sections. If the spray pattern looks off, adjust the altitude or pass spacing before you load product.
Record the final settings
After a good test run, save the exact rate, speed, pressure, swath width, and nozzle setup. That record can save time on the next job and gives you a clear baseline if output starts to shift.
If the test run matches the target output, the DJI Agras T50 is ready for the field.
Conclusion: A Simple Calibration Routine for Coverage and Cost Control
Once the checklist is done, your DJI Agras T40 is set for a clean, accurate spray job. The order matters: inspect the hardware, confirm output, verify swath, lock in the software settings, and finish with a clean-water test.
Calibration mistakes happen all the time. A repeatable checklist helps keep application rates close to target and input costs under control.
That same pre-spray routine also helps keep coverage, safety, and efficiency where they should be. If output starts to drift - for example, a worn nozzle running 10% to 15% high - you want to catch it early, not halfway through the field.
Use the same checklist before every job to spot drift, wear, and rate errors before they reach the field. Run that same routine before every spray job to keep output steady and avoid re-sprays.
FAQs
How often should I calibrate a spray drone?
Calibrate your spray system before every field use so it applies the right amount and runs at its best.
You should also recalibrate during the season any time you change key parts, like nozzles or nozzle spacing. Preseason service should cover weight sensors, pumps, and flow meters too. And it’s smart to run periodic checks during the season, since normal nozzle wear and system drift can throw things off.
What most often causes GPA errors?
Most gallons per acre (GPA) errors come down to improper calibration and worn nozzles.
Here’s the big issue: as nozzle openings wear down, especially with brass or plastic, they often flow more than intended. That means you can end up over-applying without noticing it right away.
Tank mixing mistakes can play a part too. But in most cases, the problem is mechanical. It usually happens when equipment isn’t calibrated on a routine basis during the spraying season.
How do I find the true swath width?
Conduct test flights in conditions that match your planned field work as closely as possible. That way, you can see how the spray behaves before you start the actual job.
Place water-sensitive paper perpendicular to the flight path so it shows the deposition pattern across the swath.
Use the effective swath width for your calculations. That means the width based on the overlap needed to get even coverage, not the maximum width listed by the manufacturer. Use this effective width for all application calculations.