
Call or Text: +1 (208) 425-2990
Email: Sales@DroneSprayPro.com

How Fast Charging Cuts Spray Drone Downtime
Fast charging cuts drone downtime only when the whole battery loop is planned. If you want the drone flying instead of waiting, you need enough packs, enough charger output, and a clear flow for cooling, charging, and swapping.
Here’s the short version:
- Most field delays come from battery turnaround, not rated flight output
- A spray drone may be rated at 52 acres per hour, but many crews see about 40–45 acres per hour in the field
- Hot packs usually need to cool below 104°F (40°C) before charging starts
- A common field loop is 25–35 minutes total:
- 8–12 minutes flying
- 3–6 minutes refilling and checking
- 10–20 minutes cooling
- A 3-pack rotation is the baseline:
- one flying
- one cooling or charging
- one ready
- On bigger days, many crews move to 4–6 packs per drone, and some plan 6–8 packs to avoid delays
- For about 40–80 acres, one high-output charger may be enough
- For about 150–300 acres, crews often need two chargers or a dual-channel unit to keep a no-wait loop
What I’d take from this article is simple: don’t judge charging by charger specs alone. Judge it by one question: when the drone lands, is a charged pack ready to go?
Quick Comparison
| Setup | Best for | Pack count | Main goal |
|---|---|---|---|
| 3-pack loop | Moderate spray days | 3 packs | Keep one flying, one cooling/charging, one ready |
| 4–6 pack loop | Heavy spray days | 4–6 packs | Add buffer for heat and refill delays |
| 6–8 pack plan | Large acre days | 6–8 packs | Prevent idle time across long spray windows |
| Single high-output charger | 40–80 acres | 4–5 packs | Stay ahead on lighter schedules |
| Two chargers / dual-channel | 150–300 acres | 7–8 packs | Keep a no-wait rotation |
The main point is clear: fast charging helps only when you stage packs before takeoff, separate hot and ready batteries, test field power early, and size your battery pool around acres for the day.
The Core Solution: Build a Repeatable Battery Rotation Loop
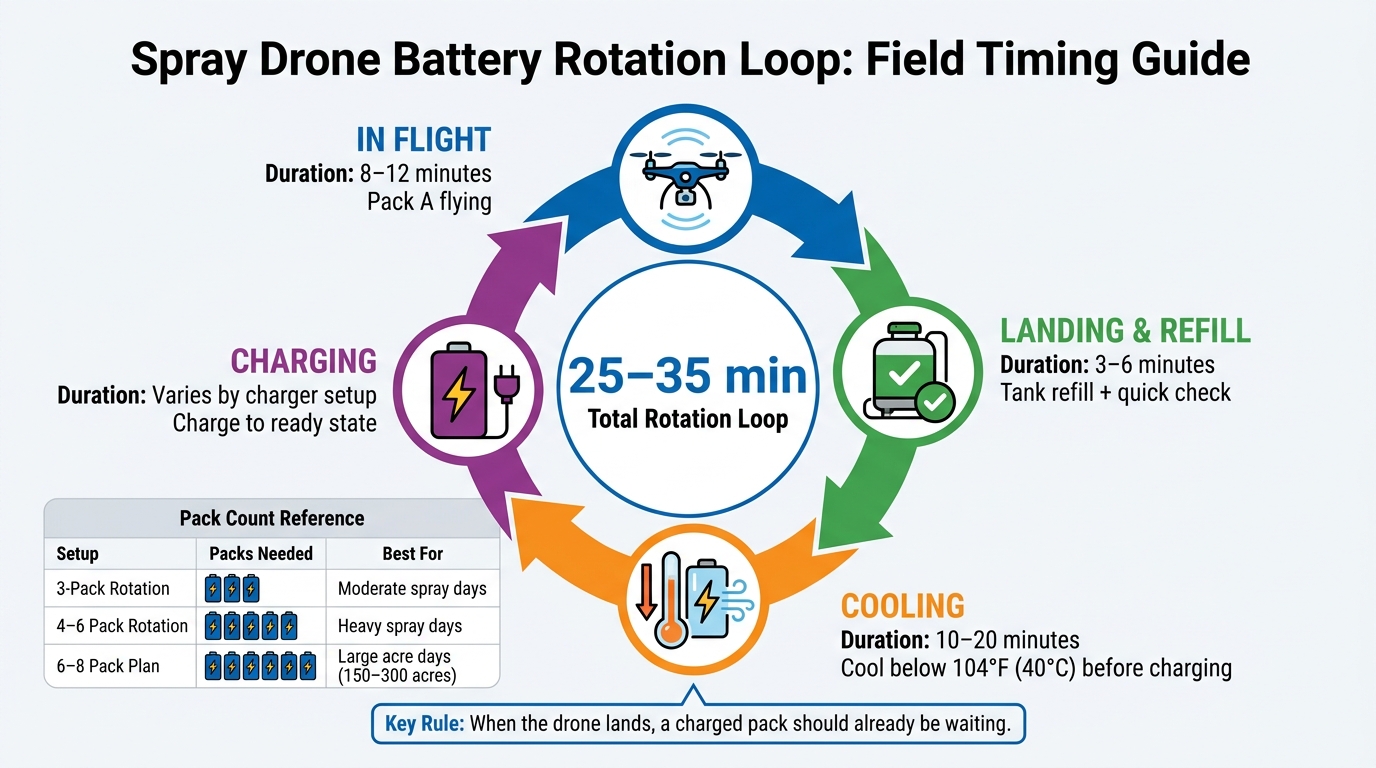
Spray Drone Battery Rotation Loop: Field Timing Guide
With packs staged at the field edge, run the same battery loop on every sortie. When that loop is dialed in, a fully charged pack is already waiting at the landing spot before the drone touches down.
Use a Three-Stage Rotation Plan
The minimum setup is three packs per drone: one in the air, one cooling, and one on the charger. As Pack A lands, Pack C goes straight onto the drone. Pack A moves to the cooling area, and Pack B - already cooled - moves onto the charger. Then you repeat the cycle.
That three-pack loop works fine for moderate workloads. But on heavy spray days, the margin gets thin fast. If cooldown takes longer than expected or refilling drags, one delay can snowball into a backlog that stalls the whole job. That’s why many experienced operators use four to six packs per drone on high-volume days. The extra packs give you a buffer, so the drone isn’t left sitting idle while the rest of the loop catches up.
Set the Turnaround Target Before the First Flight
Before the first sortie of the day, calculate your field turnaround time:
- flight time
- landing
- battery swap
- tank refill
- takeoff
Your charger and rotation plan need to deliver a cooled, fully charged pack inside that window. If turnaround starts slipping because of heat or a slow refill, add another battery to the rotation instead of pushing the charge too hard. Fast charging only cuts downtime when the whole loop is timed as one system.
That loop only works if the charging station and cooling area are set up to keep packs moving without delay.
How to Stage Packs and Chargers at the Field Edge
A clean field edge keeps the battery loop on schedule. Once that loop is in place, the field edge needs to support it. If packs get mixed together, or the power source isn’t ready before the first flight, things can go sideways fast.
Group Batteries by Status So the Crew Can Move Quickly
Split batteries into three clearly marked physical zones: ready-to-fly, cooling, and queued for charging.
Put ready packs closest to the drone’s landing spot. Keep them in a single row or on a rack, all facing the same direction, so the loader can swap them fast without hunting around.
Move cooling packs to a separate shaded, ventilated area. Keep them off bare ground, out of direct sun, and spaced so air can move around each pack. Only shift packs into the queued-for-charging zone after they cool to the manufacturer’s charging range. That way, the next pack keeps moving through the loop before the drone ends up waiting.
Use color tags and labeled racks so any crew member can spot battery status at a glance.
Set Up the Power Source and Charging Station Before the Spray Window Opens
The generator or other power source should be running and tested before the first flight, not in the middle of operations. In remote U.S. fields, that usually means placing the generator at the field edge, away from the mix area.
Size the generator with extra headroom above the combined peak load of all chargers running at the same time. Before spraying starts, run all chargers at once for a few minutes. This gives you a clear check that the generator can handle the load without voltage drops or tripped breakers.
Place chargers on stable, insulated tables or shelves. Set them under a canopy or inside a trailer to block sun and dust, and leave enough space between units so they can cool. Route extension cords so no one trips over them, and keep those cords well away from the chemical mixing area.
If the operation moves between field blocks during the day, foldable tables and rack systems that strap into a trailer make the station portable. You don’t have to rebuild the whole setup every time you relocate.
Keep Cooling, Charging, and Refill Areas Separate
Combining these three zones is one of the fastest ways to slow turnaround. Set up the work area in a one-way flow: the refill and mix table closest to the drone, the ready-to-fly battery rack directly behind it, and the charging station a short distance farther back.
The cooling area should sit between the drone operations zone and the chargers. That creates a natural path for each pack:
- hot pack removed at the drone
- cooling area
- queued-for-charging area
- charging station
- ready rack
- back on the drone
Keep a fire extinguisher rated for electrical fires near the charging station. Also set aside a separate quarantine spot for any pack that looks swollen, damaged, or unusually hot.
How to Time Charge Cycles and Size Chargers for Daily Workload
Plan Charging Around Flight Length, Refill Time, and Cooldown
Once the field station is ready, the next job is simple in theory and messy in practice: line up battery timing with the pace of spraying.
Four numbers run the whole rotation:
- Average flight time per pack: 8–12 minutes under load
- Refill and quick check at the tank: 3–6 minutes
- Cooldown before charging: 10–20 minutes until the pack is near ambient
- Charger recovery time from landing SOC to a working charge [2][3]
A pack's landing SOC matters more than a lot of crews expect. If you land with a 20–30% reserve SOC instead of pushing all the way to the low-voltage warning, the pack runs cooler, cools down sooner, and gets back on the charger faster.
A good field target is a 25–35 minute rotation loop. That usually looks like 10–12 minutes of flight, about 5 minutes for refill and a quick check, then 10–15 minutes of cooling before the pack is ready to charge [2][3]. Once you know that loop length, you can figure out how many packs and chargers the crew will need.
Match Charger Output to Low-Acre Days and High-Volume Days
On low-acre days - about 40–80 acres of spot treatment or variable-rate work - one high-output charger and a modest pack count is often enough. Flights are usually broken up by scouting or field moves, so a single charger can stay ahead.
On bigger days, especially 150–300 acres, the target changes. Now you want a no-wait rotation. That often means multiple chargers or a dual-channel unit, so at least as many packs are charging as are flying or cooling [2][3]. Put plainly: the right setup is the one that has a ready pack waiting when the aircraft lands.
Count How Many Packs the Crew Needs for a Full Day
A simple rule of thumb works well here: divide the spray window by the rotation loop length to estimate how many cycles each pack can finish, then divide total acres by acres per cycle to estimate the minimum pack count.
Here’s the math in plain English. With a 40-minute loop and a 6-hour (360-minute) spray window, each pack can complete about 9 cycles. If each flight covers about 2.5 acres, that comes to roughly 22–23 acres per pack per day. To cover 150 acres, you need at least 7 packs. In practice, 8 packs gives you a buffer for heat delays or one pack that needs to sit out [2][3].
That extra battery can save the day. It's often the gap between finishing before the wind picks up and getting bumped into the next morning.
Use these timings to choose the charger setup that matches the day's workload.
Comparison Table: Charger Setup by Turnaround Speed and Field Fit
| Charger Setup | Cycle Time | Typical Pack Count in Rotation | Best-Fit Conditions |
|---|---|---|---|
| Single high-output charger | 10–15 min | 4–5 packs | Low-acre days, 40–80 acres, spot treatments, or jobs with pauses |
| Dual-channel charger or two chargers | 9–12 min | 7–8 packs | 150–300 acre days, continuous spraying, and no-wait rotations |
When turnaround starts slipping, the usual culprits are heat, too few packs, or charger capacity that looked good on paper but doesn't hold up in the field.
sbb-itb-3b7eef7
Common Mistakes That Slow Down Battery Rotation
Even a solid charger setup can fall apart if the battery rotation slips. In most cases, the holdup comes from crew workflow, not the charger itself.
Charging Packs Before They Have Cooled
The most common slowdown starts before charging even begins. If a pack goes on the charger while it's still hot, it can trip thermal protection and sit there doing nothing useful. That ties up a charger slot while other packs that are ready to charge have to wait. At that point, the charger becomes the bottleneck.
Let hot packs sit in the shade or in moving air until they reach the manufacturer's charging range. Then move them straight onto the charger.
Using Too Few Packs for the Acres Scheduled
A charger can't fix a battery pool that's too small. If you don't have enough packs, the drone ends up waiting even when the charger is working the whole time. Crews often react by cutting cooldown time short and running packs too low, which only makes things worse across a long spray day.
The fix is pretty simple: add enough packs so the drone never waits on battery recovery during the spray window. On larger U.S. jobs, operators may plan for 6–8 packs per drone to keep a buffer for heat delays or for a pack that needs to stay out of rotation [4][5].
Treating Rated Charge Speed as Real Field Turnaround Time
Spec sheets don't tell the whole story. A charger's rated speed covers only one piece of what happens in the field. Actual turnaround also includes landing, refilling the tank, swapping the battery, cooldown, and getting the pack staged for the next flight.
Track one full flight-to-flight cycle in the field. Then use that measured turnaround time to plan acres, packs, and chargers.
Where Operators Source Batteries, Chargers, and Setup Help
Once the rotation plan is in place, the next choke point is the gear itself. If the battery plan calls for new equipment, where it comes from matters. A matched package cuts a lot of setup guesswork.
Use Complete Packages When Specifying a New Spray Setup
Buying a drone, batteries, and chargers one by one can create holes in the workflow. You might end up with too few battery packs, a charger that can't keep up, or a field power source that doesn't match the charging load.
Bundled packages help avoid that. They match the drone, battery count, charger output, and field power to the day's acres.
Drone Spray Pro offers prebuilt spray packages matched to drone, battery count, charger output, and field power. The point is simple: a battery-and-charger setup sized for the day's acres.
That kind of package saves time only when the crew knows how to run it in the field.
Get Training and Support for Battery Workflow in the Field
Drone Spray Pro pairs equipment sales with FAA licensing support and training that covers battery staging, charging, and swap timing [1]. That help gives crews a clearer way to size packs, stage batteries, and time rotation without guesswork.
Conclusion: Fast Charging Works Best When the Whole Workflow Is Timed
The takeaway is simple: fast charging only reduces downtime when the entire battery rotation loop stays on schedule.
The biggest gains happen when the battery workflow runs like one timed cycle. Each pack needs to move through flight, cooldown, charging, and the ready queue without getting stuck in one step. If one part slows down, the whole system does too.
Operators who reduce idle time most often do two things well. They stage packs and power before the first sortie, and they size battery count and charger output around the day’s workload, not just the drone’s spec sheet. That’s the part many crews miss.
Every holdup in cooling, staging, or power interrupts the loop. A hot pack charges more slowly, too few batteries create waiting time, and weak power limits charger output.
Drone Spray Pro supplies batteries, chargers, training, and complete spray-drone packages for field-ready setups.
Fast charging helps most when the whole rotation loop is timed, staged, and sized the right way.
FAQs
How do I know if I need more packs or more charger output?
If your drone is stuck on the ground while a battery charges, that’s a clear sign your power setup is too small. You either need more battery packs, more charger output, or both.
For near-continuous operation, most crews rotate three to four batteries so a fresh pack is ready by the time the tank is refilled. The goal is simple: recharge time should match or beat flight time.
What should I do if batteries stay too hot to charge in the field?
If batteries are too hot to charge, let them cool down before you plug them into the charger. Charging at room temperature is a key safety step and a smart way to care for battery life.
To cut downtime, set up a simple battery rotation plan. That gives one pack time to cool while another is in use. It also helps to store batteries in a cool, dry place between flights, so they can get back to a safe charging temperature sooner.
How can I size a battery rotation plan for my acreage?
Plan your battery rotation around flight time and charging speed. In most cases, each load gives you about 7 to 12 minutes of flight, so the goal is simple: have the next battery ready before the current one lands.
For continuous work, most operators run 3 to 4 batteries and pair them with a generator rated at 9,000 watts or more. That setup helps keep the cycle moving without long gaps between flights.
If you're handling heavier output, like 300+ acres per day, you'll usually need more room in the rotation. A setup with 6 batteries and 4 chargers can cut down on thermal stress and reduce time spent waiting for packs to cool or charge.
