Call or Text: +1 (208) 425-2990
Email: Sales@DroneSprayPro.com

Spot Spraying With Drones: Lower Chemical Runoff
Drone spot spraying cuts runoff risk by putting less chemical on the field in the first place. In one 2023 field study, a drone-based prescription map left 26.2% of a 42-acre field unsprayed, and other research shows pesticide use can drop by 20% to 30%.
If I wanted the short answer, it would be this: map the weeds, skip clean ground, avoid drainage areas, use the right sprayer drones, and don’t spray before rain or runoff-heavy irrigation. That’s what keeps more product on the weed and less moving off the field.
Here’s the article in plain English:
- Why runoff drops: less sprayed acreage means less chemical exposed on bare soil
- How to find targets: use drone imagery to spot weed patches and clean ground
- What to avoid: slopes, low spots, ditches, ponds, streams, and drainage paths
- How to build the spray plan: treat only mapped weed cells and leave no-spray buffers
- How to fly the job: use coarse droplets, air-induction nozzles, RTK guidance, and a steady flight path
- When to wait: delay spraying if heavy rain, runoff-producing irrigation, or wet, compacted soil is likely
- What to check after: logs, buffer-zone shutoff, missed spots, puddling, and flow paths
Bottom line: spot spraying works best when the map, flight settings, and timing all line up. The core idea is simple: you lower runoff by lowering total field exposure.
Map the Field and Find High-Risk Areas Before Spraying
The next step is to turn scouting data into a spray map that skips two kinds of ground: areas with no weeds and areas where runoff is more likely.
Use Drone Imagery to Locate Weed Patches and Bare Ground
Start with a scouting flight using an RGB or multispectral camera. Fly at a fixed altitude so image resolution stays consistent and small weeds are easier to spot.
For early-season scans, use ExG. It separates green tissue from bare soil better than NDVI. [1] After processing the imagery, Crop Row Identification (CRI) algorithms trace the crop rows. Then, any green vegetation found outside those rows is marked as a weed target.
To reduce the chance of herbicide hitting the crop, keep a 3.5-inch buffer on each side of the row. That still leaves inter-row weeds inside the spray zone. [1] You can also use AI to take a few labeled weed patches and extend that labeling across the rest of the field. [3]
Once the weed patches are mapped, add slope and drainage data so spray stays out of places that tend to carry water.
Mark Slope, Drainage Paths, and Waterway Buffers on the Map
Next, layer terrain data over the weed map. RTK elevation data can show low spots and drainage channels, which are the parts of the field where applied product is most likely to move after rain or irrigation. [1]
Before you build the prescription map, mark no-spray buffers along ditches, ponds, and streams. It’s a simple step, but it helps keep the spray plan tight and avoids treating ground that could move product off target.
Convert Scouting Data Into Prescription Zones
With weed patches and high-risk areas marked, turn the scouting data into a spray file: spray here, skip there, and only widen targets when weed growth calls for it. Leave drainage paths and water buffers unsprayed.
Use a 1-meter grid and flag only the weed cells for treatment. [1][3] If spraying is delayed, expand each target a bit to account for weed growth. [3]
This mapping step also helps with tank loading. When the prescription map shows exactly where spray is needed, you can load only the volume required for that job. That cuts leftovers, reduces waste, and keeps spray off non-target ground.
With the map ready, load it into a DJI Agras T50 and tune the mission for precise coverage.
sbb-itb-3b7eef7
Configure the Spray Mission to Keep Chemicals on Target
With the prescription map ready, the next step is to load it into a precision sprayer drone and dial in settings that keep spray where it belongs.
Load Prescription Maps and Define Spray and No-Spray Areas
Import the prescription file, assign the treatment zones, and mark no-spray areas so they stay out of the mission plan. When the map is loaded the right way, the drone can skip those no-spray zones on its own.
"Using a drone, a more precise spray is possible by integrating the prescription map. It allows targeting the specific problematic area of the field." - Deepak Joshi, Precision Ag Specialist, Kansas State Extension [4]
That matters for a simple reason: the drone isn’t just flying a field map. It’s following a plan tied to the spots that need treatment and avoiding the spots that don’t.
Select Droplet Size, Nozzles, Flight Height, and Speed
For herbicide applications, coarse droplets are the better pick. They are less likely to move off target. Air-induction nozzles should sit below the rotors to cut drift and keep droplets out of rotor turbulence. [2]
Flight setup also plays a big part. For herbicide sprays, fly 8–12 feet above the canopy. Keep the drone at a steady, moderate speed to limit turbulence and drift. Aim for 3–7 mph winds and 60–85°F temperatures to help stop droplets from evaporating too fast. [4]
| Setting | Recommended Range | Why It Matters |
|---|---|---|
| Flight Height | 8–12 ft above canopy | Keeps swath uniform and helps limit drift |
| Wind Speed | 3–7 mph | Higher speeds increase off-target drift |
| Temperature | 60–85°F | Helps prevent droplets from evaporating too quickly |
| Droplet Size | Coarse (herbicides) | Less prone to drift than fine mist |
| Nozzle Type | Air-induction | Produces larger, more stable droplets |
A good way to think about it: if droplet size, nozzle choice, and flight height are off, even a solid prescription map can miss the mark.
Use RTK and Repeatable Flight Paths for Accurate Coverage
RTK positioning ties the prescription map to the actual flight path. With high-precision guidance, the drone can follow repeatable paths and keep chemicals inside the defined treatment zones. [1][4]
Repeatable paths also help prevent skips and overlaps. That means less waste and less off-target exposure.
Once the mission is locked in, timing the application becomes the next runoff control.
Time Applications Around Rain, Irrigation, and Soil Conditions
Once the spray map and flight settings are locked in, timing becomes the next part of runoff control. You can plan a precise mission and still miss the mark if the timing is off. Rain or irrigation can move fresh spray off target before it has time to do its job.
Avoid Spraying Before Heavy Rain or Runoff-Producing Irrigation
Before any application, check the local forecast and the field’s irrigation schedule. If heavy rain or irrigation that can create runoff is likely soon after spraying, delay the mission. Spray ahead of rain or irrigation only when the label and dry-down window allow it [2][4]. After that, make sure the field can absorb the application.
Check Soil Moisture, Compaction, and Field Conditions
Saturated, crusted, or compacted soil increases runoff risk [2]. A high-capacity spraying drone may still be able to reach a wet field when a ground rig can’t, but field access does not mean the field can safely hold the application [4].
A few warning signs are easy to spot:
- Standing water
- Slick tracks
- Old water flow paths
These conditions point to higher runoff risk [2]. A pre-spray scouting flight with RGB imagery can help spot these trouble areas before chemicals are loaded [1]. Drones also avoid adding wheel-track compaction in wet fields [2].
Match Spray Timing to the Product Label and Dry-Down Requirements
Next comes the label. Not all pesticides react the same way after application when moisture shows up. Some labels require a set dry-down window before rain or irrigation. In plain terms, the product needs to stay on the leaf long enough to resist wash-off, so read the label before you schedule the mission [2].
If the label allows it, a silicone-based adjuvant can help with leaf coverage and retention [2]. That said, adjuvant performance still depends on compatibility with the specific chemical and the field conditions, so check the mix before application [2].
Runoff-Reduction Checklist and Key Steps Summary
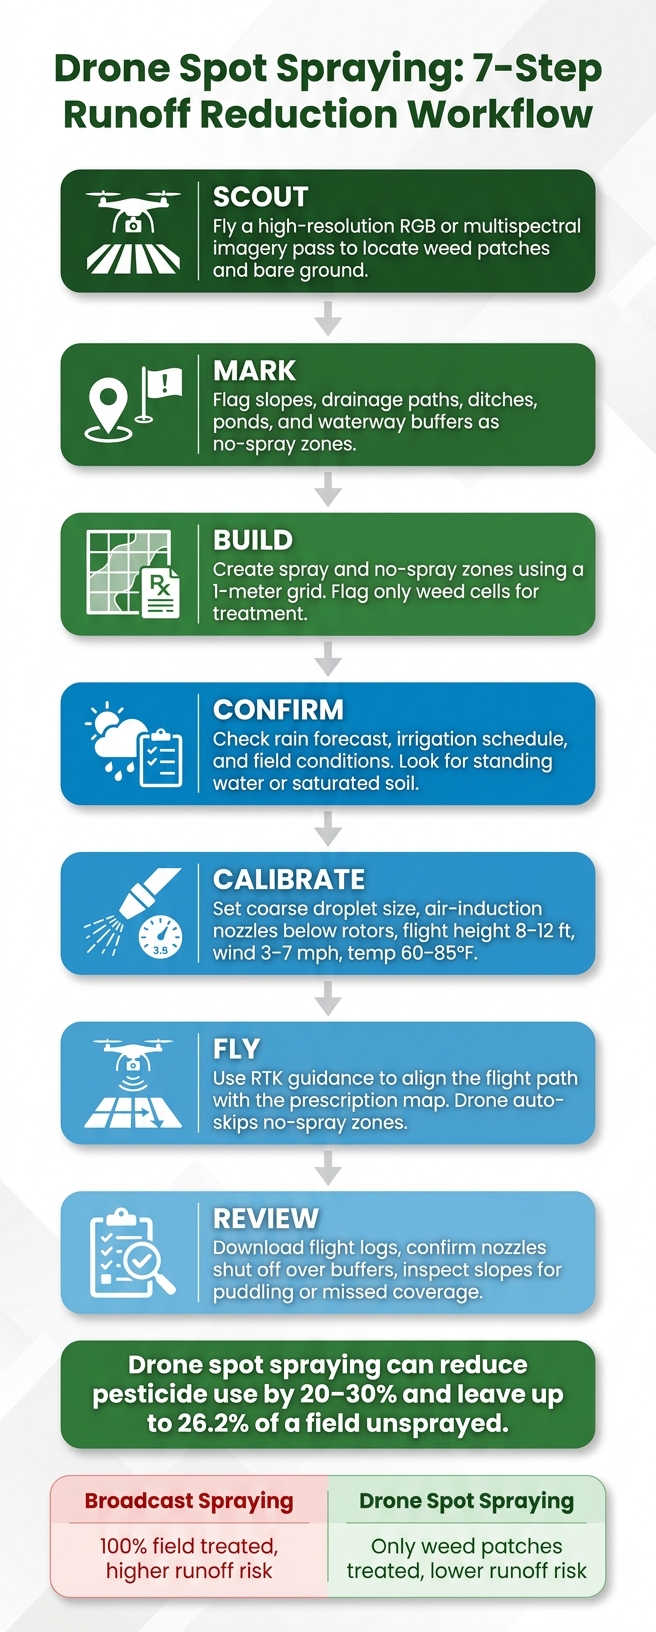
Drone Spot Spraying: 7-Step Runoff Reduction Workflow
Pre-Flight to Post-Spray Checklist for Spot Spraying
Use this final sequence before each mission to keep spray on target and out of runoff paths.
- Scout - Fly a high-resolution imagery pass to find weed patches.
- Mark - Flag slopes, drainage paths, and waterway buffers.
- Build - Set spray and no-spray zones with polygons or circles.
- Confirm - Check the forecast, irrigation timing, and field conditions for standing water or saturated ground.
- Calibrate - Set droplet size, nozzle type, flight altitude, and speed. Place nozzles beneath the rotors to cut drift. [2]
- Fly - Use RTK to line up the flight path with the prescription map.
- Review - Download flight logs, confirm the nozzles stayed off over buffer zones, and inspect slopes for missed coverage, puddling, or flow.
Broadcast Spraying vs. Drone Spot Spraying
This workflow is what sets spot spraying apart from a full-field pass. Here’s the short version:
| Feature | Broadcast Spraying | Drone Spot Spraying |
|---|---|---|
| Treated Area | 100% of the field | Only identified weed patches |
| Runoff Risk | Higher due to total chemical load | Lower; less chemical available to move off-site |
| Precision | Low; ignores weed distribution | High; targets specific zones from prescription maps |
Accurate maps, tight zones, and good timing help keep product on the weed, not in the water.
Conclusion: The Steps That Keep Chemicals Where They Belong
Cutting chemical runoff with drone spot spraying comes down to four connected choices: accurate weed mapping, tight prescription zones, careful timing around rain and irrigation, and close attention to slope, soil, and drainage before the mission starts.
"Using drones to map the weed population ahead of spraying ensures the operator can mix the correct amount of chemical in the sprayer's tank for the chosen application. This is a major advantage over real-time analysis... which could leave significant levels of chemical in the sprayer." - Stephen Burcham, General Manager, Horsch UK [3]
FAQs
How accurate does weed mapping need to be?
For spot spraying to work well, weed maps need to be highly accurate. If the map is off, the sprayer can miss problem patches or apply chemicals where they aren’t needed.
That’s where RTK GPS comes in. It can deliver centimeter-level precision, usually within 1 to 2 centimeters, which helps keep spray rates steady and cuts down on overlap.
Accuracy also depends on a few other things, like image resolution, flight altitude, and the weed species being mapped. So if you want spray applications to match the problem areas on the ground, high-resolution mapping matters.
What field conditions create the most runoff risk?
The biggest runoff risk usually shows up where soil is wet or waterlogged, the land is steep, or the site has sharp elevation changes. Those conditions make it easier for chemicals to move where they shouldn’t. Obstacles on the site can also interfere with spray coverage and make the job harder to manage.
Hot, dry weather can increase vapor drift. And when wind speeds go above 10 mph, the chance of off-target drift goes up too. A solid site survey, plus avoiding poor weather and field conditions, helps limit chemical movement into unintended areas.
How soon after spraying can rain or irrigation happen?
There’s no single minimum wait time for rain or irrigation after you apply a herbicide. It depends on two things: rainfastness and how fast the plant takes up the product.
For the best results, and to help prevent runoff, always follow the herbicide label for the required rainfast period.
