Call or Text: +1 (208) 425-2990
Email: Sales@DroneSprayPro.com

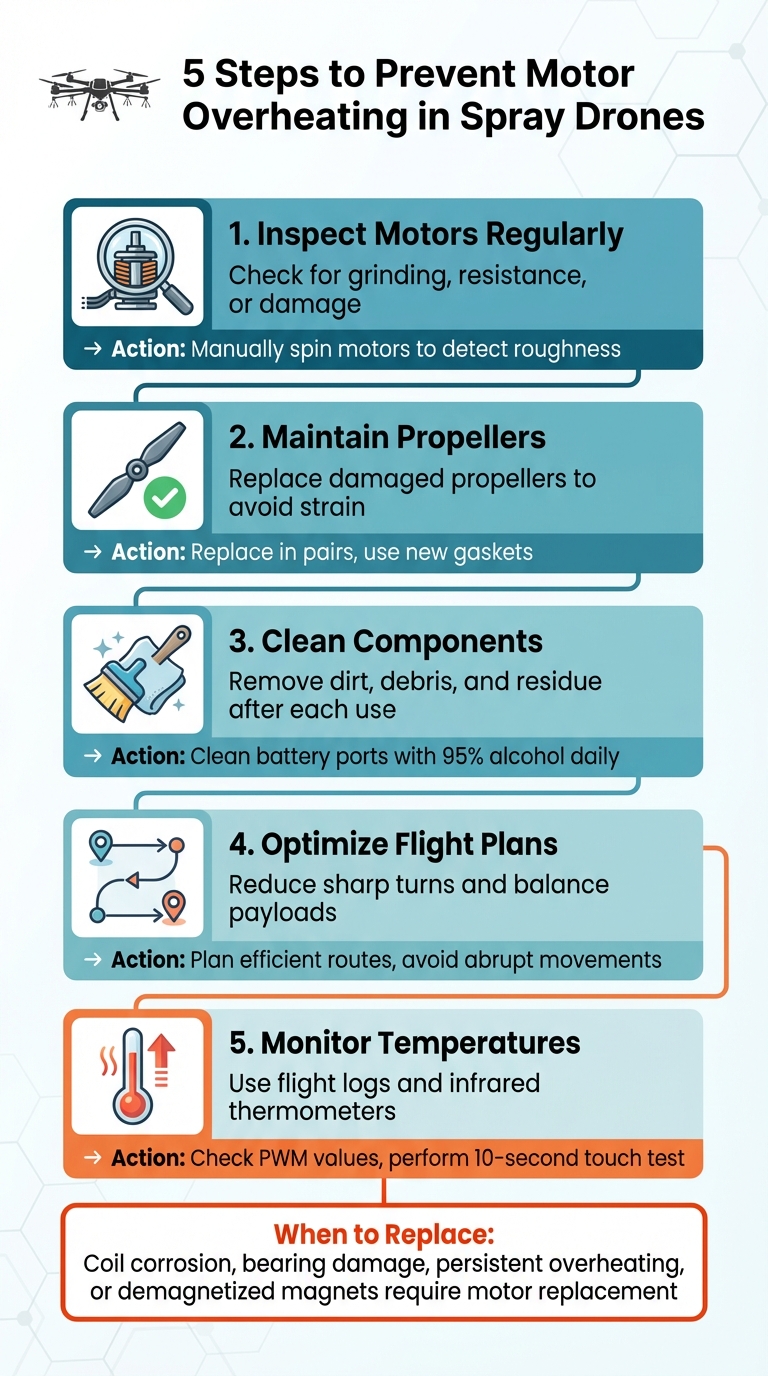
Fixing Motor Overheating in Spray Drones
Motor overheating in spray drones can lead to costly repairs, downtime, and reduced efficiency. Key causes include heavy payloads, damaged propellers, dirt buildup, and electrical issues. High ambient temperatures and blocked cooling systems also exacerbate the problem. To prevent overheating:
- Inspect motors regularly: Check for grinding, resistance, or damage.
- Maintain propellers: Replace damaged ones to avoid unnecessary strain.
- Clean components: Remove dirt, debris, and residue after each use.
- Optimize flight plans: Reduce sharp turns and balance payloads.
- Monitor temperatures: Use flight logs and infrared thermometers.
If overheating persists or motors show signs of internal damage (e.g., coil corrosion, excessive noise, or demagnetization), consider replacing the motor or consulting professionals. Regular maintenance and smart operational adjustments are critical to keeping your spray drones reliable during peak seasons.
5-Step Motor Overheating Prevention Guide for Spray Drones
how to FIX HOT MOTORS on your DRONES!
What Causes Motor Overheating in Spray Drones
Understanding why motors overheat is key to preventing failures. Spray drones used in agriculture face intense demands that can push their propulsion systems to the limit. Several factors often combine to create excessive heat, which can lead to serious problems. Let’s break down the main contributors to motor overheating.
Heavy Loads and Intense Flight Conditions
Spray drones are designed to carry heavy chemical loads, often operating at full capacity for long stretches. For example, spraying 350 acres in a single day with quick refills leaves motors with little time to cool down [2]. Add in demanding flight patterns - flying at maximum throttle, sharp turns, or battling strong winds - and motors are forced to work harder, generating more heat [3]. Over time, this relentless thermal stress takes a toll, especially during extended operations.
Propeller and Motor Issues
Physical damage is another common cause of overheating. Damaged propellers disrupt aerodynamics, forcing motors to work harder to maintain stability. Even minor imperfections can lead to significant heat buildup [3]. Internal motor issues, such as broken bearings, coil corrosion, or debris inside the motor, also create resistance. These problems can often be detected manually - if a motor feels rough or resists spinning, it’s a red flag. As DJI Agriculture notes:
Encountering difficulty while spinning the motors could point to a potential issue. Should such a resistance or roughness occur, it's normally caused by coil corrosion, broken bearing or other damages in the motor [3].
Repeated overheating can lead to permanent damage. For instance, high-strength magnets inside the motor may demagnetize, altering the motor’s performance and making it more prone to future overheating [1].
Dirt and Wear from Harsh Environments
Agricultural settings are tough on drones. Dust, crop debris, and chemical residues can build up on motor components, causing friction and resistance. Sticky substances like fungicides can coat moving parts, increasing drag and heat production. Over time, this mechanical wear adds to the strain on the motors.
Electrical and Power System Problems
Electrical issues can also contribute to overheating. Faulty wiring, loose connections, and corroded battery terminals increase resistance, which generates heat. For example, corroded battery ports often show a "green-tinged rust", which disrupts electrical flow and produces heat at connection points [3]. Misaligned motors or loose mounts can further complicate matters, as the flight controller has to work overtime to maintain stability, putting extra stress on the motors and their electronic speed controllers (ESCs) [3].
External Heat and Cooling Challenges
Ambient conditions play a big role in motor temperatures. High outside temperatures and blocked vents can trap heat, especially during peak spraying seasons. Imagine operating in 95°F (35°C) heat with high humidity - motors start out hot and have less ability to cool down. Debris blocking airflow around the motors only makes things worse, creating a perfect storm for overheating during busy summer months.
| Operational Factor | Impact on Motor Temperature | Recommended Mitigation |
|---|---|---|
| Mechanical Wear | Increases friction and resistance | Manually spin motors to check for grinding or resistance [3] |
How to Diagnose Overheating Motors
Identifying overheating issues in motors early can save you from expensive repairs and downtime, especially during crucial spraying periods. A structured diagnostic approach helps determine whether you're dealing with a minor tweak or a more complex problem.
Check Flight Data and Prioritize Safety
Start by reviewing your flight logs before handling the drone. Look for PWM (pulse width modulation) values across all motors. If one or two motors consistently require more power to maintain a steady hover, they’re likely working harder than they should be, which could point to efficiency problems [4]. Autopilot logs often reveal such imbalances, and you should also check for firmware warnings or ESC (electronic speed controller) overload alerts from the last flight.
After the drone lands, let it cool for a few minutes before testing the motors. Here’s a quick field test: try holding your finger on each motor for 10 seconds. If it feels too hot to touch, overheating is likely the issue [4]. Compare the temperatures of all motors - if only a few are running hot, it could indicate a center of gravity (COG) issue, where those motors are compensating for an unbalanced load [4].
Once you’ve reviewed the data and performed basic checks, move on to a physical inspection.
Inspect Motors and Components
Turn off the drone and remove the propellers before inspecting the motors. Manually spin each motor - it should rotate smoothly and freely. If you notice grinding, resistance, or rough spots, there’s likely an issue. According to DJI Agriculture:
"Encountering difficulty while spinning the motors could point to a potential issue... normally caused by coil corrosion, broken bearing or other damages." - DJI Agriculture [3]
Also, inspect the propellers for any signs of damage and check the battery ports for corrosion, as these can strain the motors unnecessarily [3]. Clean battery connections daily using a 95% alcohol solution and a microfiber cloth to ensure optimal power delivery. Additionally, confirm that motor mounting bolts aren’t too long - bolts that touch the internal copper windings can cause electrical shorts and excessive heat [1] [4].
After inspecting the motors and components, perform controlled tests to validate your findings.
Perform Tests and Monitor Temperatures
Conduct a hover test without a payload in an open area. While performing 180° or 360° turns, listen closely for any unusual whining sounds from the motors. These sounds can signal stress that may not be visible during a ground inspection [3]. Use an infrared thermometer to measure the temperature of each motor after hovering for 2–3 minutes.
For a deeper assessment, use configurator software to run the motors without propellers and analyze the gyroscope traces. If you notice excessive noise in the traces, it could indicate vibration or bearing issues, which often lead to heat buildup [4]. This type of testing can catch problems early, preventing more severe failures during critical operations.
sbb-itb-3b7eef7
How to Fix and Prevent Motor Overheating
Tackling motor overheating involves making specific adjustments to operations and sticking to a consistent maintenance routine. The goal is to address immediate issues while implementing practices that reduce long-term wear on the motor.
Adjust Payloads and Flight Plans
Managing payloads and planning efficient flight paths can ease the strain on motors. For example, before handling heavy applications, let the drone idle and perform incremental tests - starting with an empty flight and gradually increasing the load. For the DJI Agras T40, ensure it operates steadily at a maximum flow rate of 3.1 gal/min (12 L/min) [3]. Plan routes that avoid sharp turns or abrupt movements to reduce motor stress. These adjustments, combined with regular maintenance, help keep the motor running smoothly.
Maintain Propellers and Motors
The condition of propellers and motors directly impacts heat generation. Damaged propellers - those with chips or cracks - can lead to vibration and drag, forcing motors to work harder than necessary. Replace damaged propellers in pairs and always use new gaskets to maintain balance. Additionally, check motor alignment to ensure even power distribution. Secure motor mounts using a 16 mm socket to prevent instability. During test flights, pay attention to high-pitched whining sounds from the motors, as this could signal internal damage needing attention.
Improve Cooling Systems
Beyond standard maintenance, improving cooling efficiency is crucial. Before the season begins, inspect arm safety locks and motor bases to ensure they’re stable and free of excess vibrations that could strain the motor [3].
Follow Regular Maintenance Schedules
Sticking to a maintenance schedule can prevent minor issues from turning into costly repairs. For instance, clean electrical ports after every flight to ensure proper power delivery and reduce resistance. Before the season starts, manually spin the motors to check for resistance or unusual noises, which could indicate bearing or coil problems.
| Maintenance Frequency | Component | Action Required |
|---|---|---|
| Daily / Post-Flight | Electrical Ports | Clean battery pins and ports with 95% alcohol |
| Pre-Flight | Propellers | Inspect for chips or cracks; replace in pairs |
| Pre-Season | Bearings/Coils | Manually spin motors to check for resistance |
| Weekly | Motor Alignment | Tighten mounts with a 16 mm socket |
When to Repair, Replace, or Get Professional Help
Signs Your Motor Needs Replacement
Once you've run your diagnostic tests, certain signs make it clear whether your motor needs repair or a complete replacement. Minor issues, like loose hardware, can often be fixed with simple repairs. However, if manual rotation reveals resistance, roughness, or visible damage - such as coil corrosion or broken bearings - replacement is typically the better option. As DJI Agriculture explains:
Should such a resistance or roughness occur, it's normally caused by coil corrosion, broken bearing or other damages in the motor. Please contact your dealer to have further check. [3]
Other red flags include internal corrosion, particularly greenish rust on pins and ports, which indicates moisture has damaged the electrical components. A whining noise during test flights might also point to internal damage. Excessive heat is another major concern - it can demagnetize internal magnets, triggering a cycle of overheating that field repairs can't resolve. If your motor consistently runs at high temperatures, it's a strong indicator of irreversible damage. These symptoms help you decide whether the issue is manageable on-site or if it requires expert attention.
Getting Professional Support
Sometimes, even the best on-site troubleshooting won't be enough, and that's when professional help becomes necessary. Problems like coil corrosion, crash damage, or recurring error codes are best handled by experts. Authorized Service Centers (ASC) have the tools to analyze flight logs and thoroughly assess motor damage, uncovering issues that might not be immediately visible. After a crash, avoid attempting on-field part replacements - professionals need to inspect the motor's structural and electrical integrity to ensure safety and performance.
If you're maintaining spare motors and electronic speed controllers (ESCs) nearby, quick replacements can often be done in just 5–10 minutes, keeping downtime to a minimum. However, for more complex issues, professional evaluations are essential.
For example, Drone Spray Pro offers a range of services, including preseason inspections, operator training, and access to genuine parts for DJI Agras, Talos T60X, and XAG drones. Their training programs help operators recognize early warning signs and practice effective flight planning to reduce motor strain. They also provide tailored advice on system configuration and maintenance schedules, particularly for Idaho's farming conditions. This kind of expert guidance can help prevent overheating and keep your equipment running smoothly during critical application periods.
Conclusion: Keeping Spray Drone Motors Cool
Preventing motor overheating comes down to consistent care and smart practices. Start with pre-flight checks - look for clean electrical contacts, listen for unusual noises, and inspect for early signs of motor stress. These quick steps can save you from bigger headaches later.
Preseason inspections are equally important. Tightening motor mounts to reduce vibrations and running a full-tank stress test can help you spot hidden issues before they become serious. As highlighted in the DJI Agras T40 Preseason Checklist:
Ensuring that your T40 and its components are in top condition before you hit the fields can prevent costly downtimes and potential accidents. [3]
Routine inspections like these are essential for keeping your motors dependable over time.
If you notice signs of internal damage - like coil corrosion, bearing problems, or persistent overheating - it’s often better to replace the motor rather than attempt field repairs. Keeping spare motors and ESCs on hand ensures you can make quick replacements and minimize downtime. For more complex issues, especially after crashes, rely on Authorized Service Centers. They have the tools and expertise to diagnose motor problems accurately.
FAQs
What are the common signs that a spray drone's motor is overheating?
If a spray drone’s motor starts overheating, there are a few telltale signs to watch for. You might notice the motor or the ESC (Electronic Speed Controller) feels excessively hot when touched. On top of that, the controller could show warnings like a motor-temperature error or motor backup throttle loss message. In some situations, the drone might automatically lower its throttle or even begin a self-landing process to prevent further harm.
Recognizing these signs early can help you tackle the problem quickly and protect your equipment from lasting damage.
What can I do to prevent my spray drone's motors from overheating during busy spraying seasons?
To avoid motor overheating, start by using approved propellers and making sure both the propellers and motors are correctly aligned and firmly mounted. On hotter days, it’s a good idea to lighten the payload and shorten flight times. Flying during cooler parts of the day, such as early mornings or late afternoons, can also make a difference. When your drone isn’t in use, keep it and the batteries shaded to prevent unnecessary heat exposure. Additionally, regularly check motor and ESC temperatures during operation to spot potential issues early. These measures can help your drone perform smoothly, even during demanding spraying seasons.
How do I know when to call a professional for motor overheating issues in my spray drone?
If your spray drone’s motor keeps overheating or showing errors even after basic troubleshooting, it might be time to call in a professional. But before you do, there are a few steps worth trying:
- Check the propeller alignment to ensure everything is balanced.
- Use only manufacturer-approved propellers - steer clear of third-party options.
- Lighten the payload to reduce strain on the motor.
- Inspect and reseat all ESC-to-motor connections to make sure they’re secure.
- Swap the ESC to a different arm to identify potential hardware issues.
If these steps don’t fix the issue, a skilled technician can step in to pinpoint and resolve more complicated problems, helping your drone run reliably and safely.