Call or Text: +1 (208) 425-2990
Email: Sales@DroneSprayPro.com

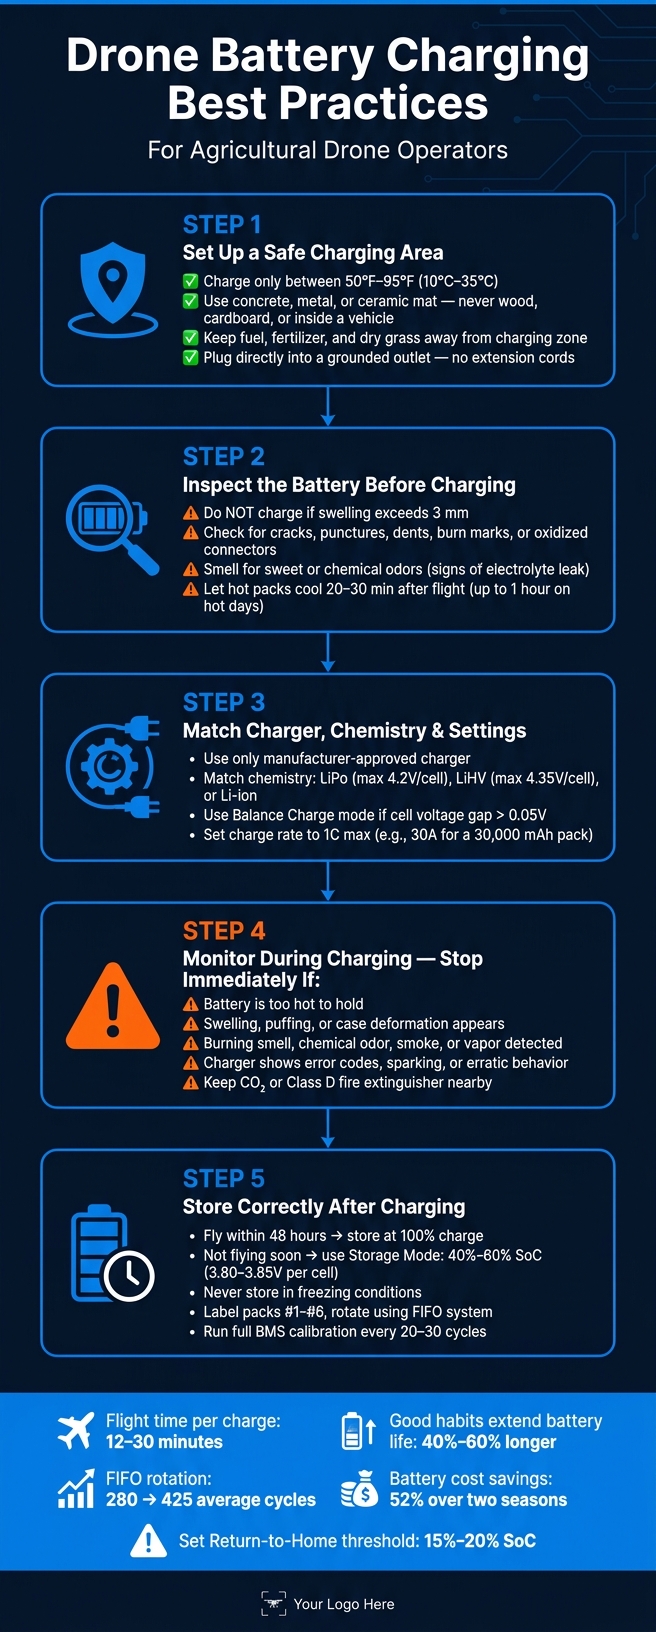
Best Practices for Drone Battery Charging
Bad charging habits can cut flight time, wear out packs faster, and add fire risk. If I want my spray-drone batteries to last, I need to charge them in a cool, dry place, inspect each pack first, use the right charger and settings, watch the battery the whole time, and store it at the right charge level when I’m not flying soon.
Here’s the short version:
- I only charge between 50°F and 95°F (10°C to 35°C).
- I let hot batteries rest for 20 to 30 minutes, or up to 1 hour on hot days.
- I check for swelling, cracks, leaks, bad smells, and damaged connectors before charging.
- I use the approved charger and the correct battery mode: LiPo, Li-ion, or LiHV.
- I stick to the maker’s limit, with 1C as the common charge rate.
- I stop at once if the pack gets too hot, swells, smells odd, or shows charger errors.
- I charge to 100% only if I plan to fly within 48 hours.
- If not, I store packs at 40% to 60% SoC or about 3.80 to 3.85V per cell.
- I track cycles, rotate batteries, and recalibrate the BMS every 20 to 30 cycles.
A few numbers stand out. Farm spray drones often fly for only 12 to 30 minutes per charge, so even a small drop in battery health can trim work time fast. And good battery handling can extend usable life by 40% to 60%, which can cut replacement costs over a season.
If I keep the process simple and repeat the same routine every time, I lower risk and get more use from each battery pack.
Drone Battery Charging Best Practices: Step-by-Step Safety Checklist
How are you managing your batteries | Drone Tips with James McDanolds
sbb-itb-3b7eef7
Set up a safe charging area and inspect the battery before you start
Before you charge anything, get the space right and give the battery a close look. Use a dry, well-ventilated area out of direct sun. Charge on concrete, metal, or a ceramic mat. Never charge on wood, cardboard, or inside a vehicle [1][4]. The battery should be charged only when the temperature is between 50°F and 95°F (10°C to 35°C) [1].
Clear the area first. Keep fuel, fertilizer, pesticide packaging, and dry grass away from the charging spot [7]. Plug the charger straight into a grounded outlet that can handle the load. Skip extension cords and power strips. Under high current, they can lead to voltage drop or sparking [1]. Stay close while the battery charges, and never leave it unattended [1][6].
Check for swelling, cracks, leaks, and damaged connectors
Inspect the battery before every charge. Start with swelling. If the pack bulges more than 3 mm, do not charge it [5]. Then check the case for punctures, dents, or cracks.
Take a look at the connector pins on both the battery and the charger too. Watch for oxidation, burn marks, chemical residue, or loose wires [1][7]. If the connectors don’t fit cleanly, don’t force them.
Smell matters here too. A sweet or chemical odor can point to an electrolyte leak, even when the outside looks fine [4]. If a battery smells wrong, looks swollen, or has damaged connectors, it should not be charged.
Let batteries cool to room temperature before charging
A hot pack from a recent flight may not accept a charge right away. Give it time to cool to room temperature first. Wait at least 20 to 30 minutes after landing before connecting the pack to the charger [1][7]. On hot days, wait up to an hour [1][4][8].
If you’re cycling through several batteries during a long spray day, rotate them and let each one rest in a shaded, ventilated spot before charging.
Once the pack is cool and clean, match it with the correct charger and the right settings.
Match the charger, battery type, and charge settings
On spray days, the wrong charger setting can eat into flight time and battery life. Once the battery passes inspection, pair it with the right charger and the right settings. Before you plug in anything, confirm that the charger matches the battery’s chemistry, voltage, and cell count.
Agricultural drone batteries may be LiPo, Li-ion, or LiHV. LiPo cells typically stop at 4.2V per cell, while LiHV packs go up to 4.35V per cell [1][4]. Pick the wrong chemistry setting, and you can undercharge the pack or push it too far. With high-energy 12S or 14S packs, even small voltage mistakes can lead to lithium plating and create a real safety risk [9]. That’s why the charger mode needs to match the pack before charging starts.
Use the correct charger and approved charging mode
Use only the charger that came with the drone or one the manufacturer explicitly approves. For multi-cell packs, use Balance Charge unless the manufacturer says to use something else. This mode evens out voltage across each cell, which helps avoid the imbalance that cuts flight time and shortens battery life [1][3].
If the voltage gap between cells is more than 0.05V, balance charge the pack [5]. Choosing the wrong mode can throw cells out of balance and wear the pack down faster. The right settings help limit imbalance, heat, and early wear.
Set a safe charge rate based on manufacturer limits
For most agricultural drone batteries, 1C is the standard safe charge rate. For example, a 30,000 mAh battery should be charged at 30A [1][5]. Going above that creates more heat, speeds up cell wear, and increases the risk of fire or BMS failure [1][3].
Use the manufacturer’s maximum charge current as your limit. For day-to-day charging, slower rates put less stress on the battery and help cut heat and wear.
Check the battery label, choose the correct mode, and never override BMS warnings. Once the charge rate is set, keep an eye on the battery during charging for heat, swelling, or other warning signs.
Monitor charging to prevent overcharging and catch warning signs early
Once charging begins, keep an eye on the battery until you disconnect it. Check the pack’s temperature and confirm the charger is behaving as expected during the full cycle. On multi-battery days, rotate packs so one is flying, one is cooling, and one is charging [7][5]. While charging, watch for heat, swelling, odd smells, and charger errors.
Stop charging if the battery gets too hot, swells, smells odd, or makes unusual sounds
If the battery gets too hot to hold, starts puffing or swelling, smells burned or chemical-like, hisses, or the charger shows an error code, stop charging at once [1][7].
The table below shows the main things to check:
| Condition during charging | Continue | Stop now |
|---|---|---|
| Battery temperature | Warm within normal manufacturer expectations | Too hot to hold |
| Battery shape | Flat and firm | Swelling, puffing, or case deformation |
| Smell and air quality | No unusual odor | Burning smell, chemical odor, smoke, or vapor |
| Charger behavior | Normal status lights or expected app indicators | Error codes, repeated faults, sparking, or erratic charger behavior |
| Battery surface | Dry and intact | Leaking fluid, residue, or burn marks |
Move the battery only if it’s safe to do so. If not, clear the area and keep a CO₂ or Class D fire extinguisher rated for lithium fires nearby.
Disconnect and stage the battery when charging is complete
As soon as charging is done, disconnect the pack and place it in a cool, shaded spot. Leaving a fully charged battery connected can add risk if a protection circuit fails [6][1]. After you unplug it, do a quick visual check for extra heat, swelling, or connector damage. Then move it to a clean, dry, shaded staging area away from direct sun and other heat sources.
Charge on the right schedule and store batteries to protect lifespan
After charging, storage time matters just as much as charge level. The moment a battery comes off the charger, what you do next affects how long that pack will last. Good battery handling can extend usable life by 40%–60% beyond baseline expectations [2]. Over a season, that can turn into plain old cost savings.
Avoid leaving batteries at 100% charge for long periods when not flying soon
Charge to 100% only within 48 hours of a planned spraying job [7][2]. If a battery is going to sit between jobs, don’t leave it full. Use storage charge instead.
Here’s the simple rule:
- If you’ll fly within 48 hours, keep the pack at full charge.
- If not, switch to Storage Mode and keep it at 40%–60% SoC, or about 3.80–3.85V per cell [7][5][10].
Also, never store batteries in freezing conditions. Low temperatures can damage lithium-ion cells [7].
Build a repeatable battery routine for multi-battery field days
A steady routine helps keep your battery fleet in good shape and cuts down on nasty surprises in the middle of the season. Label your packs - for example, #1 through #6 - and rotate them with a First-In, First-Out (FIFO) system. That way, one battery doesn’t end up doing all the heavy lifting while the others sit around.
This small habit made a big difference for a Midwest agricultural service company. It increased average battery lifespan from 280 cycles to 425 cycles and cut battery-related costs by 52% over two seasons [2].
Track charge cycles in your battery app or maintenance log. Then run a full calibration every 20–30 cycles: charge to 100%, discharge to 10%, and recharge to 100% to recalibrate the Battery Management System (BMS) [7]. Set your drone’s Return-to-Home threshold at 15%–20% to help avoid deep discharges that lead to permanent capacity loss, and remove any battery that shows swelling greater than 3 mm right away [5].
FAQs
What happens if I charge a drone battery while it’s hot?
Charging a drone battery while it’s still hot is risky. It can also shorten the battery’s life by a lot.
Here’s why: heat speeds up chemical wear inside the cells. Over time, that means lower performance, less flight time, and a shorter overall lifespan.
There’s also a safety issue. Charging creates more heat inside the battery, and that extra heat can increase the risk of fire or explosion.
Because of that, many battery management systems won’t let charging start right away. They often delay or block charging until the battery cools down, which is usually about 20 to 30 minutes after a flight.
How do I know if my battery needs balance charging?
Balance charge your agricultural drone battery when the voltage gap between cells is more than 0.05 V. This matters because cells in multi-cell packs tend to drift over time. When that happens, you can lose flight time and wear the battery out sooner than expected.
You can check cell voltage with your drone’s controller, a voltage meter, or a cell checker. As a rule of thumb, keep the cells within 0.1 V of each other.
What charge level is best for storing batteries between spray jobs?
Store batteries at 40% to 50% charge if you won’t be flying for more than 48 hours. That works out to about 3.8V to 3.85V per cell and helps cut down wear from leaving them full or close to empty.
Use your smart charger’s storage mode, or discharge the battery by hand. Then keep it in a cool, dry place at 68°F to 77°F.