Call or Text: +1 (208) 425-2990
Email: Sales@DroneSprayPro.com

Best Practices for Compressing Drone Mapping Data
Drone mapping generates enormous datasets, especially in agriculture. Managing these files is challenging but critical for efficient workflows. This article explores practical strategies for compressing drone mapping data to reduce file sizes by 50–90% without losing accuracy. Here's what you need to know:
- Why Compression Matters: Drone mapping for sprayer drones can produce terabytes of data, making storage, processing, and sharing difficult, especially in areas with limited internet.
- Common Data Formats: GeoTIFF, LAS/LAZ, MrSID, and JPEG 2000 are key formats for geospatial data. Choosing the right one balances quality and size.
- Compression Techniques: Use lossless compression (e.g., LZW, DEFLATE) for analysis and lossy methods (e.g., JPEG, MrSID) for visualization. Adjust parameters like pixel size and quality settings to fit your needs.
- Tools to Use: Software like Pix4D, QGIS, GDAL, and GeoExpress simplifies compression and processing.
- Workflow Tips: Plan flights carefully, back up files systematically, and validate compressed data to maintain accuracy.
- Storage Solutions: Cloud Optimized GeoTIFFs and STAC catalogs help manage and share compressed data efficiently.
Compression is essential for handling large datasets, enabling faster processing, cost savings, and smoother operations in agricultural drone mapping.
Drone Mapping Data Formats Explained
Types of Data Generated by Mapping Drones
Mapping drones used in agriculture generate a variety of file types, each tailored to specific tasks on the farm. One of the most common is GeoTIFF (.tif), a standard format for orthomosaics and digital elevation models. These files include georeferencing metadata, making them essential for accurate mapping [8][10]. For 3D terrain modeling, drones produce LAS files, which store point cloud data with X, Y, and Z coordinates, along with additional attributes. A compressed version of this, known as LAZ, offers the same data in a smaller file size, saving storage space without sacrificing detail [5][9][10].
Some formats are designed for highly specific needs. For example, MrSID (.sid) uses wavelet-based compression, allowing large mosaics to include multi-resolution "pyramids" within a single file. This setup makes it possible to zoom in and out quickly without decompressing the entire dataset [7][8]. Similarly, Cloud Optimized GeoTIFF (COG) supports efficient streaming and downloading of specific sections via HTTP range requests, making it easier to work with massive datasets online [8][11]. For high-resolution aerial imagery, formats like ECW and JPEG 2000 (.jp2) offer excellent compression ratios while maintaining fast rendering speeds, ensuring smooth performance even with large files [7][8][11].
To put this into perspective, an uncompressed 8-bit RGB image measuring 10,000 x 10,000 pixels takes up about 300 MB of storage. With a compression ratio of 20:1, that same file can shrink to just 15 MB [7]. Formats like MrSID and JPEG 2000 excel in this area, enabling "progressive decoding." This feature ensures that users can access and navigate large maps efficiently, even when dealing with enormous datasets [8][11]. Choosing the right format impacts not just storage but also how smoothly you can work with the data.
What Makes Drone Mapping Files So Large
Now that we’ve covered the formats, let’s dive into why drone mapping files tend to be so massive. One key reason is the high spatial resolution provided by multispectral mapping drones. These devices capture imagery at sub-decimeter levels, delivering pixel densities far beyond what satellite imagery can offer [4][5]. Another factor is bit depth. Many drones equipped with multispectral sensors capture data in 12-bit or 16-bit formats to retain the dynamic range needed for vegetation indices like NDVI. This increases file sizes significantly compared to standard 8-bit images [11]. Adding more spectral bands only compounds the file size, as each band represents another layer of data [6][11].
"The higher the camera resolution the greater the amount of data. Even short flights result in multiple GBs of data." – Extensis [4]
File size also grows due to pyramids and overviews, which store lower-resolution versions of the imagery within the same file. These additions, while increasing file size by around 40%, are essential for smooth panning and zooming in GIS software, especially for files with over 3,000 rows or columns [6][11]. Additional elements like internal tiling and embedded metadata (e.g., coordinate systems and sensor details) add another 3% to 6% in overhead [6][8][11].
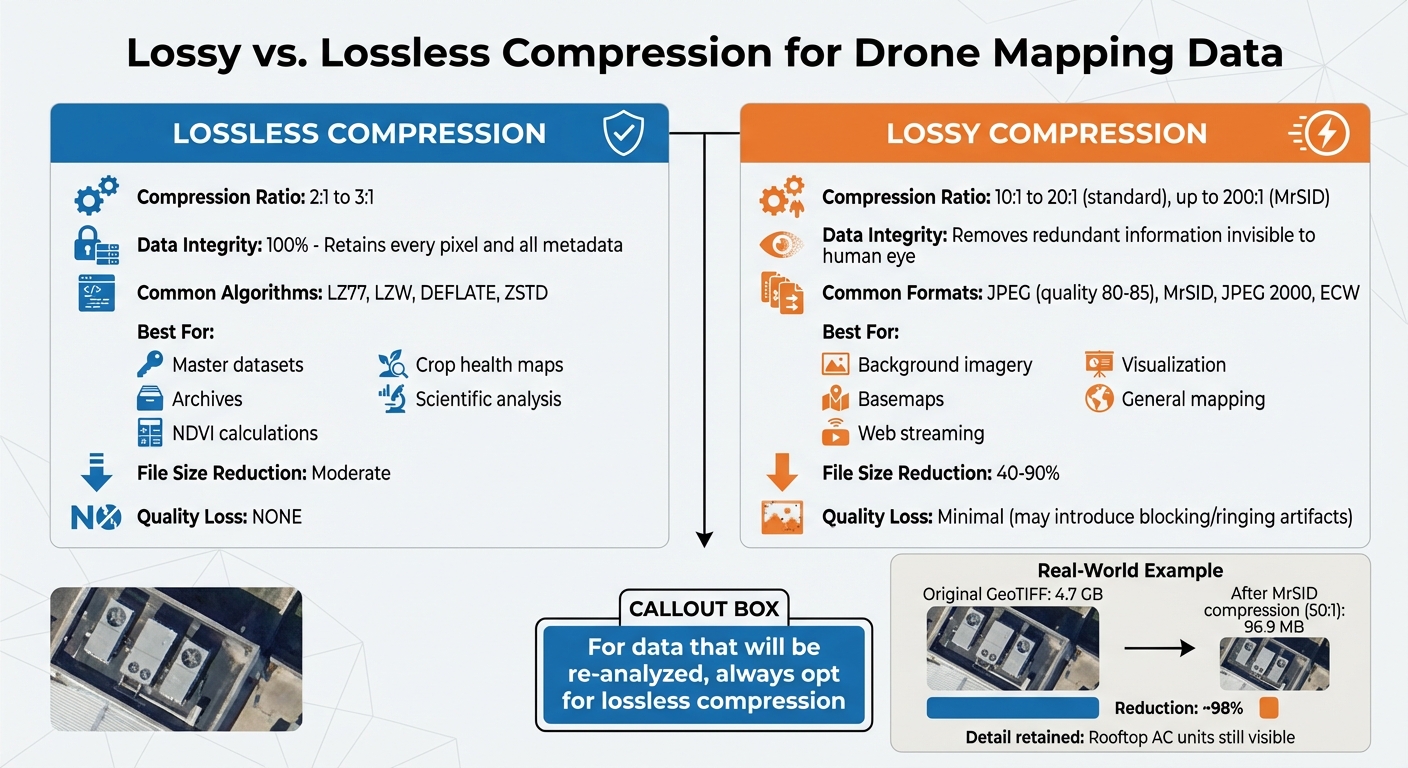
A real-world example highlights these challenges. In December 2020, Extensis showcased imagery captured by the Trimble UX5 drone at a 5 cm resolution. The raw GeoTIFF file of a golf course and residential area in Colorado was initially 4.7 GB. Using GeoExpress, it was compressed into the MrSID format with a 50:1 ratio, reducing the file to just 96.9 MB. Despite this drastic reduction, the compressed file retained enough detail to clearly display rooftop air conditioning units [4]. This example underscores both the scale of data produced by drones and the importance of efficient compression techniques in managing it.
sbb-itb-3b7eef7
Reducing Orthomosaic file size walk-through
Compression Techniques for Drone Mapping Data
Drone Mapping Data Compression Methods Comparison Chart
Lossy vs. Lossless Compression Methods
When managing drone mapping data, it's essential to understand the difference between lossy and lossless compression. Lossless compression retains every pixel and all metadata from the original files, making it ideal for precise tasks like calculating NDVI or creating crop health maps [13][15]. Algorithms such as LZ77, LZW, DEFLATE, and ZSTD are commonly used for this purpose, offering compression ratios around 2:1 to 3:1 while maintaining complete data accuracy.
On the other hand, lossy compression permanently removes redundant information, which is often invisible to the human eye. This approach achieves far higher compression ratios - typically 10:1 to 20:1 for standard imagery, with formats like MrSID reaching up to 200:1 while preserving visual clarity [4][15]. However, lossy methods can introduce visual artifacts like "blocking" or "ringing" [14].
For data that will be re-analyzed, always opt for lossless compression.
In agricultural workflows, use lossless compression for master datasets, archives, or files intended for further analysis. For tasks prioritizing speed over precision - like background imagery, basemaps, or web streaming - lossy compression is a better fit. A practical tip for lossy compression is to set JPEG quality between 80 and 85, which can shrink file sizes by 40–50% with minimal visible quality loss [14].
Next, let’s look at the tools available for implementing these compression strategies.
Software Tools for Compressing Geospatial Data
Drone operators have access to several software tools that simplify compression for agricultural mapping. Pix4Dmatic and Pix4Dmapper allow users to export data with either lossless (e.g., LZW) or lossy (e.g., JPEG) compression, offering flexibility in quality and file size [16]. Similarly, QGIS provides robust post-processing options, letting users re-scale pixel sizes, apply JPEG compression within GeoTIFFs, and tweak advanced GDAL settings like COMPRESS=LZW and PREDICTOR=2 for better compression [16][18].
For more specialized needs, GDAL (Geospatial Data Abstraction Library) supports advanced codecs such as ZSTD for fast cloud-based decompression and LERC (Limited Error Raster Compression) for precision-controlled compression [17]. GeoExpress by LizardTech is another option, excelling in compressing large datasets like multi-gigabyte aerial imagery and LiDAR point clouds using the MrSID format [4][5].
An example from Propeller Aero demonstrates the efficiency of these tools: a 39 GB GeoTIFF was reduced to just 4.25 GB - a nearly 90% reduction - using JPEG compression in QGIS, all without losing spatial accuracy [18]. Additionally, enabling GDAL’s NUM_THREADS=ALL_CPUS can speed up slower algorithms like Deflate by approximately 30% [17].
These tools provide practical solutions for balancing data quality and file size in drone mapping workflows.
Balancing File Size and Data Quality
To achieve the right balance between file size and quality, fine-tune compression parameters based on your specific needs. For digital elevation models, using LERC compression with defined error tolerances works well. For example, setting a precision threshold of 1 mm (MAX_Z_ERROR=0.001) can improve compression ratios from 1.64 to 2.07, saving over 50% of space. For general field mapping, a 1-meter tolerance can yield even greater savings, with compression ratios of 5.3 and space reductions of over 80% [17].
When dealing with floating-point data, enable the correct predictor setting - PREDICTOR=3 for floating-point data or PREDICTOR=2 for integer data - when using LZW or Deflate. This technique, known as "horizontal differencing", enhances compression ratios without losing data [17]. Additionally, enabling tiling (TILED=YES) for large GeoTIFFs allows farm management tools to access only the necessary data subsets, improving performance [17][12].
"As you don't change the pixel size, you do not lose the resolution and accuracy quality, which makes [JPEG compression] the best choice." – Propeller Aero Support [18]
To avoid alignment issues, ensure coordinate systems and GeoTIFF tags are preserved [5]. For visualization-only files, selecting the smallest possible data type (e.g., Byte instead of Float32) can further reduce file sizes. For large-scale tasks, tools like GeoExpress or GDAL scripts can streamline batch processing, ensuring consistent compression across multiple datasets [5][6].
Adding Compression to Your Drone Workflow
Planning Flights to Reduce Data Size
Efficient flight planning is key to managing file sizes effectively. Start by calculating your drone's usable flight time. Subtract 20–25% of the rated battery endurance to ensure a reserve, allowing you to plan flight blocks that avoid rushed operations and reduce redundant or overlapping imagery [2].
Before takeoff, switch your camera to manual mode. Fixed settings for ISO, shutter speed, and white balance ensure consistent lighting, which simplifies post-processing [2]. If you're working in areas with elevation changes greater than 10 feet, enable terrain-following mode. This keeps the Ground Sampling Distance (GSD) consistent and helps maintain the quality of your data [2].
To stay organized, adopt a clear naming convention right from the start. For example, use a format like "MM-DD-YYYY_Block_01." This is especially helpful for large-scale projects, such as agricultural mapping, where datasets can include over 200,000 images and span multiple terabytes [2].
"10 am–2 pm is going to give you the best light [for mapping]." – Chad Colby, Colby Agtech [19]
Before leaving the field, check sample images for clarity and review flight logs for any GPS anomalies. These steps help you avoid collecting unnecessary data, making post-flight processing much smoother.
Processing and Compressing Data After Flights
Once your data is collected, secure it immediately to maintain its integrity. Back up your SD cards using a consistent folder structure, which makes it easier to organize and compress files later.
For compression, use lossless methods for master datasets to preserve quality. For visualization or web sharing, controlled lossy compression formats like MrSID work well. These strategies keep file sizes manageable without sacrificing critical details. For massive projects - such as those covering 25,000+ acres or involving over 200,000 images - cloud processing is a practical option. It offers the scalability and speed that local workstations often can't match [2].
After compression, validate the results. Compare point counts, ensure spatial alignment, and test the files in your GIS application to confirm everything is working as expected.
Storage and Sharing Options for Compressed Files
Once your data is compressed, choose storage and sharing solutions that balance speed and scalability. Cloud Optimized GeoTIFFs (COGs) are a great option for sharing mapping data. They use internal tiling, which allows software to retrieve only the pixels it needs, rather than downloading entire multi-gigabyte files [12].
For larger operations, the Meta Raster Format (MRF) can optimize cloud storage by separating metadata, index, and data [11]. Natural color images can often be compressed 5–10 times with minimal quality loss. Additionally, using a standard Coordinate Reference System (like an EPSG code) can improve load times by 5–20 times compared to custom projections [11][12].
If you're sharing highly compressed files, such as those using MrSID at 200:1 ratios, specialized tools can help you efficiently distribute data across remote teams [4]. For local workstations, raster proxies are worth considering. These small files reference large cloud datasets, caching metadata and retrieving image tiles on demand [11].
To avoid visual artifacts, set the NoData flag in your metadata so map edges remain transparent. Using SpatioTemporal Asset Catalogs (STAC) can also help you organize and retrieve files efficiently across different seasons and data types [12].
For more tips on optimizing agricultural drone operations, Drone Spray Pro offers comprehensive guidance - from flight planning to data compression and management.
Conclusion
Handling the massive datasets generated by agricultural drone mapping requires effective compression techniques. By applying the methods discussed here, you can shrink geospatial file sizes by an impressive 50–90% [1]. Whether you're working with a few hundred acres or managing expansive projects over 25,000 acres, compression ensures smoother workflows and helps control costs.
Choose your compression methods based on your specific needs. For datasets where precision is critical - like scientific analysis or master files - lossless formats such as LZW or DEFLATE are ideal. On the other hand, for tasks like visualization, web sharing, or general mapping, lossy formats like MrSID or JPEG2000 can significantly reduce file sizes while maintaining enough clarity for informed decision-making [1].
"As LiDAR and aerial data grow exponentially, compression must no longer be just an option, but a necessity." – LizardTech [5]
Smaller, compressed files offer practical benefits beyond size reduction. They speed up cloud uploads and processing times, which is crucial when time-sensitive decisions need to be made - whether it's about crop health, irrigation adjustments, or pest control [3].
To implement these strategies effectively, start with solid flight planning. Lock your camera settings, use consistent naming conventions, and validate compressed files after every flight to ensure spatial accuracy and data integrity. These steps not only help manage large datasets but also cut hardware costs and streamline your operations.
FAQs
When should I use lossless vs. lossy compression for farm maps?
When accuracy is non-negotiable, like with crop health maps or survey data, lossless compression is the way to go. It keeps every bit of the original data intact, ensuring precise analysis. On the other hand, lossy compression works well for basemaps or visuals where slight quality loss is fine. It creates smaller files that load faster, making it perfect for quick access in drone mapping or agricultural tasks.
How can I tell if a compressed file is still accurate in GIS?
To keep a compressed GIS file accurate, it's important to validate the data thoroughly. Start by reviewing the metadata to ensure all details remain intact. Then, compare sample data points from before and after compression to check for any discrepancies. Finally, test the compression's impact by analyzing the quality of sample imagery. These steps can help confirm that the compression method preserves both accuracy and precision.
Which settings shrink GeoTIFFs most without changing resolution?
To shrink the size of a GeoTIFF file without lowering its resolution, try advanced compression techniques such as ZSTD (available starting with GDAL 2.3) or Limited Error Raster Compression (introduced in GDAL 2.4). These methods are designed to maintain the quality of your data while significantly cutting down file size. Just ensure that the software you're using supports these algorithms to get the best outcome.