
Call or Text: +1 (208) 425-2990
Email: Sales@DroneSprayPro.com

Battery Safety Standards for Ag Drone Operators
One bad battery can ground your drone, start a fire, and put people at risk. If I had to cut this guide down to the main steps, I’d keep these: charge packs in one fire-safe area, inspect them before every charge and flight, store them at 3.80–3.90 V per cell if they’ll sit more than 48 hours, isolate any pack with swelling, leaks, heat, or cell imbalance over 0.1 V , such as a damaged DJI Agras flight battery, and train every crew member on the same written SOP.
Here’s the short version:
- Charging area: noncombustible surface, airflow, smoke detector, dry sand, and a fire extinguisher
- Storage: 50°F to 77°F, out of sun, away from fuel, hay, and chemicals
- Inspection: check casing, connectors, temperature, cell balance, cycle count, and flight-time drop
- Fail signs: swelling, cracks, leaks, punctures, corrosion, smoke, overheating, or 20%+ less flight time
- Fire response: alert crew, clear the area, use sand or a battery-rated extinguisher, call 911 if needed
- Paperwork: keep charge logs, pack IDs, fault records, and training records
- Rules to use: FAA Part 107, OSHA, NFPA, DOT shipping rules, and the manufacturer’s battery and intelligent battery station instructions
A few numbers stand out. Leaving packs fully charged for weeks can cause 15–30% permanent capacity loss over six months. And field stress - heat, dust, water, impact, and pesticide contact - can push lithium packs toward failure faster than many crews expect.
A simple battery SOP is not just paperwork. It’s how I help stop fires, cut downtime, and keep unsafe packs out of the air.
Mastering Battery Safety & Maintenance for Agras Drones
sbb-itb-3b7eef7
How to Set Up a Safe Charging and Storage Area
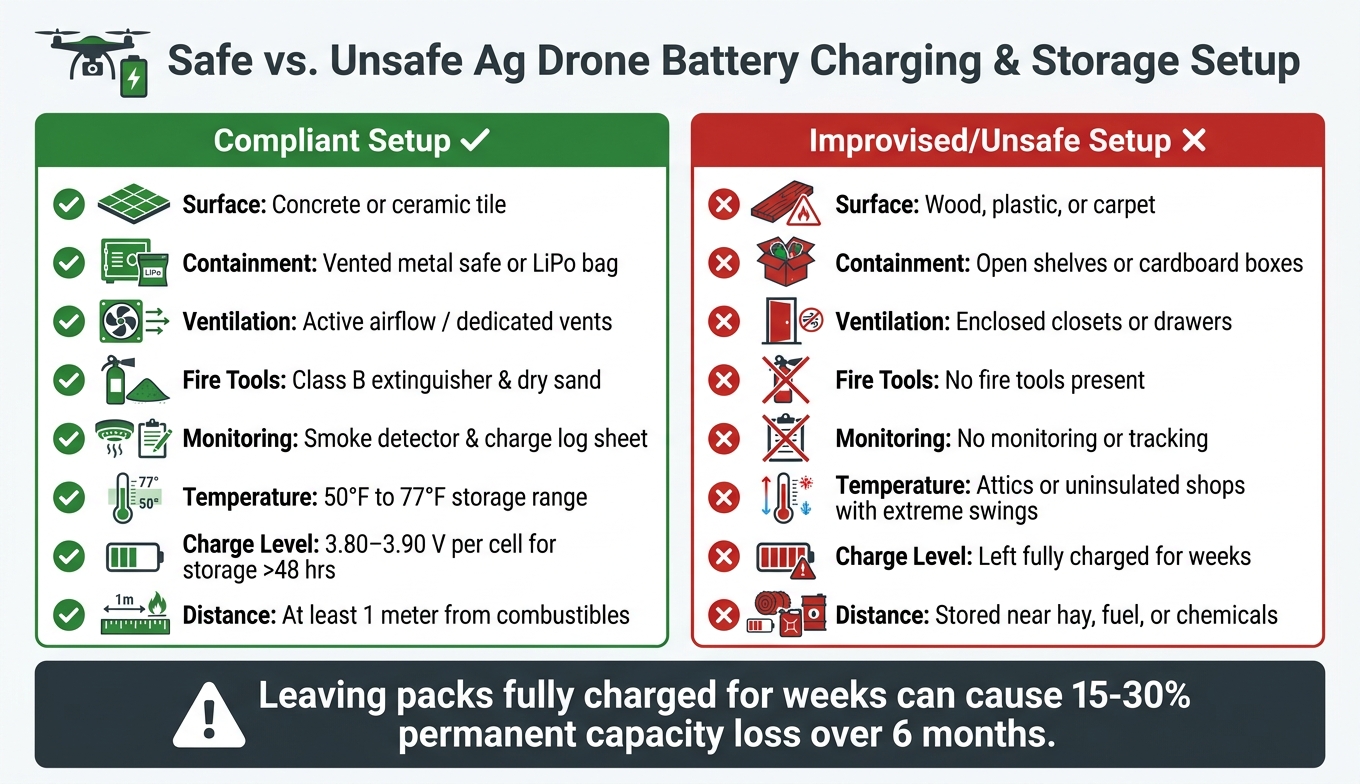
Ag Drone Battery Safety: Compliant vs. Unsafe Setup at a Glance
Start with a dedicated battery area. That’s where many pack failures begin: during charging or while the battery sits in storage.
Choose the Right Location, Surfaces, and Ventilation
Set up one spot just for batteries, and keep it at least 1 meter (3.3 feet) away from combustible items like hay, chemicals, and cardboard. Use a noncombustible surface, such as a concrete floor or a ceramic-lined workbench. Good ventilation matters too, so if a battery vents during charging, gases have room to dissipate instead of building up.
Skip attics and uninsulated farm shops. Big temperature swings in those spaces can put extra stress on battery packs.
Equip the Area for Charging, Monitoring, and Emergencies
Use a manufacturer-approved smart charger with balance charging and automatic shutoff if heat or voltage goes out of range.[2]
Keep these items close by:
- Class B fire extinguisher and dry sand
- Nitrile gloves for leaking packs
- Heat-resistant gloves for moving an overheating battery to a safe zone
- A smoke detector
- A charge log
Here’s what a safe setup looks like compared with a risky one:
| Feature | Compliant Setup | Improvised/Unsafe Setup |
|---|---|---|
| Surface | Concrete or ceramic tile | Wood, plastic, or carpet |
| Containment | Vented metal safe or LiPo bag | Open shelves or cardboard boxes |
| Ventilation | Active airflow/dedicated vents | Enclosed closets or drawers |
| Fire Tools | Class B extinguisher & dry sand | No fire tools |
| Monitoring | Smoke detector & log sheet | No monitoring or tracking |
Store Packs at Safe Charge Levels and Temperatures
If you’re storing packs for more than 48 hours, keep them at 3.80–3.90 V per cell. Leaving batteries fully charged for weeks can lead to a 15–30% permanent loss in capacity over six months.[1]
Store batteries between 50°F and 77°F. Keep them out of direct sunlight, away from humid areas, and far from extreme heat. In winter, keep packs above 41°F. Before use, bring them inside a house, vehicle, or thermal box so they can warm up.
These rules apply to both daily-use batteries and packs sitting through the off-season. Check stored batteries every two months. Inspect them and recharge on a regular schedule. If a pack looks swollen, feels unusually hot, or seems to be off-gassing, label it, separate it from good inventory, and place it in an isolated container until it can be checked or disposed of the right way.
Before every charge, inspect the pack first.
How to Inspect Batteries Before Charging and Flight
A visual check before every charge and every flight is one of the easiest ways to catch trouble early. This needs to be routine, not something you do now and then. Use the same check before charging and before flight.
Run a Pre-Charge and Preflight Battery Check
Start with the case. Look for swelling, cracks, punctures, leaks, or any sign that the battery housing took a hit. A swollen pack is not safe to charge or fly. Then inspect the terminals and connectors. Corrosion, contamination, bent pins, or a loose housing are all reasons to pull the pack from rotation. After that, confirm the battery temperature is within the manufacturer's limits. If it feels unusually hot before charging even starts, that's a sign something is already wrong.
Once the outside looks good, check the battery data in the BMS or monitoring app. Review charge level, cell balance, and cycle count. Health alerts can warn you about imbalance or overheating before flight. [3]
Track Cycle Count, Performance Drop, and Heat Patterns
Keep a log of cycle count, charge level, temperature, voltage balance, and any changes in performance. This doesn't need to be fancy, but it does need to be consistent.
If a battery keeps giving you shorter flight times, takes longer to balance, or throws charger errors, don't brush it off as a one-time glitch. Those are early warning signs. A 20% or more drop in expected flight duration is a clear sign to pull the pack for a closer review. [3]
Apply Pass-Fail Criteria Before Returning a Pack to Service
Operators need a clear decision framework for every pack before it goes back into service. Not a hunch. Not "it seems fine." The table below shows simple pass, monitor, and fail criteria for the checks that matter most.
| Category | Pass - Safe to Use | Monitor - Review Closely | Fail - Isolate Immediately |
|---|---|---|---|
| Physical Condition | Intact casing, no leaks, no punctures | Minor scuffs; terminals slightly worn but functional | Swelling, cracks, leaks, or punctures [2][3] |
| Temperature | Cool to the touch; stable during charging | Unusually warm during a standard charge cycle | Excessive heat, smoke, or signs of thermal runaway [2][3] |
| Voltage/Balance | Cells balanced; no charger errors | Slow balancing; occasional charger errors | Rapid self-discharge; cell imbalance over 0.1 V [3] |
| Connector Condition | Clean, tight, straight pins | Slightly worn pins but still making solid contact | Corrosion, contamination, bent pins, or loose housing [2] |
| Performance | Consistent flight times; stable power output | Shorter flight times; inconsistent power output | 20%+ drop in expected flight duration [3] |
If a pack hits even one "Fail" condition, isolate it right away. Don't leave it in the charging area or sitting with good inventory. Label it clearly and move it to a separate container until it can be assessed or disposed of the right way. Any pack that fails here should move straight to isolation and disposal procedures.
How to Handle Damaged Packs and Respond to Battery Fires
Once a pack fails inspection, act fast. A failed pack stays risky until it’s isolated, documented, and taken out of service.
Isolate Swollen, Leaking, Punctured, or Overheating Batteries
Stop using the pack right away. If it’s safe to do so, move it to a nonflammable isolation area on concrete or dry sand, well away from fuel, farm chemicals, and buildings. If you have one, put it in a vented fire-resistant container. Then keep people clear.
Do not reuse, charge, or repair a damaged pack. Write down the pack ID, the fault, the date, and the action taken. That small paper trail matters when you’re managing battery safety across a crew.
Follow a Posted Fire Response Plan for Smoke, Heat, or Flames
Learn the warning signs before things get out of hand: hissing, odor, swelling, or fast heating all mean it’s time to move NOW. Lithium battery fires can burn without outside oxygen. [1]
The response order is simple:
- Detect the problem
- Alert your crew
- Evacuate the immediate area
- Call 911 if the fire can’t be safely contained
Use dry sand or a battery-rated extinguisher. Do not use water unless your fire plan or emergency responders tell you to.
Post the plan where everyone can see it. In a tense moment, no one wants to guess what comes next.
Dispose of and Ship Batteries Under U.S. Rules
After the pack is secured, log the incident and send it through an approved disposal channel. Treat damaged packs as hazardous waste. Send them to an approved recycler or hazardous-waste facility. Follow DOT shipping rules and local drop-off instructions before moving any pack. [1]
Post these steps in the charging area and train every crew member to follow them.
Build Battery Safety Into Staff Training and Farm SOPs
Once your handling steps are set, the next job is simple: make sure everyone follows them the same way, every time.
Train Every Role on Charging, Inspection, and Emergency Actions
Battery safety falls apart fast when roles are fuzzy. Each person on the crew needs a clear job.
Pilots should handle preflight checks and watch for in-flight battery alerts. Ground crew should manage charging, visual inspections, and damaged-pack isolation. If a pack leaks, they also need nitrile gloves and eye protection ready to use. Managers should keep inventory logs, track cycle counts and purchase dates, and update SOPs each year or whenever equipment changes.
Regular training helps cut battery incidents. Don’t stop at onboarding. Run refresher briefings every quarter and cover the same core topics each time: early signs of battery wear, charging in hot or cold field conditions, steps for isolating a damaged pack, and emergency shutdown procedures [3].
Then put those role-based steps into writing.
Write and Update a Farm Battery Safety SOP
Start with the manufacturer’s instructions, then add rules for your site.
Your SOP should include:
- A posted inspection checklist in the charging area
- A simple pack log
- A status label system with pack ID, cycle count, and green, yellow, and red labels so ground crew can pick the right pack without guesswork [1]
Review the SOP once a year and also after any incident or equipment change [3].
Conclusion: The Battery Safety Standards to Prioritize First
Put training into a written SOP and review it every year. The main standards in this guide come down to a short list of non-negotiables: a dedicated charging area with proper ventilation, a set inspection routine before every charge and every flight, immediate isolation of any pack that fails a check, a posted fire response plan, and training records for every role on the farm.
Good SOPs help protect people, equipment, and uptime.
FAQs
How often should I replace ag drone batteries?
There’s no fixed schedule for battery replacement.
Swap a battery out right away if you spot safety warning signs like swelling or deformation over 3 mm, cracks, punctures, leakage, or heat damage to wiring or connectors.
You should also replace any battery that no longer holds a charge or can’t power the drone in a steady, dependable way.
A few simple habits can help the battery last longer: regular inspections, avoiding deep discharges, and using proper storage cycles.
What should I do if a battery gets wet or contaminated?
If a battery is exposed to water or chemical contamination, inspect it right away. Check for residue, leaks, corrosion, swelling, physical damage, or a chemical odor.
If you see fluid or any foreign matter on the connectors or interface, wipe it off with a dry cloth or brush. Stop using the battery immediately and remove it from service if you notice swelling, damage, or odor.
Can I transport damaged drone batteries in my farm vehicle?
No. Never transport damaged drone batteries in your vehicle.
If a battery is swelling, leaking, deformed, or has exterior damage, treat it as unsafe and take it out of service at once. Moving it in your vehicle creates a serious fire risk. Contact your local dealer or authorized service center for help with proper handling and disposal.
